4. Adding Ad B2c Authentication to an Asp Net Core Api

This is the fourth post in a series that covers creating a Xamarin.Forms app and an API, both secured by AD B2C. This follows on directly from the third post and is short and self contained.
In the last post we created and Api with authentication capability, which we commented out and deployed as an Azure App Service. This post details how to fully implement that authentication and link it up to the AD B2C tenant that we set up in the first post.
TL;DR - the code is here: https://github.com/AlecDTucker/ADB2C-XF-API
As with the previous posts, the screenshots you'll see are taken from Visual Studio for Mac, but the Windows version will be similar.
Also, in common with other posts in this series, you'll see redacted ids. See my comments and links on this in the first post. There should be enough information visible in these ids to distinguish between them.
We'll begin by uncommenting the code that we commented out in the last post.
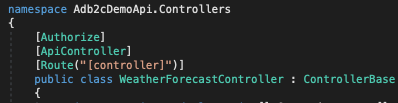
In Controllers/WeatherForecastController.cs, uncomment this line:
[Authorize]
In the ConfigureServices method in Startup.cs, uncomment these lines:
services.AddAuthentication(JwtBearerDefaults.AuthenticationScheme)
    .AddMicrosoftIdentityWebApi(Configuration.GetSection("AzureAdB2C"));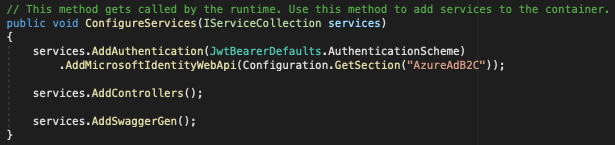
Now we'll turn our attention to the configuration details required to hook this up to our existing AD B2C tenant, which means opening appsettings.json.
If you recall from the second post, we set up the following values, hard coded into the ApplicationSettingsService class (temporarily).
public string ApiBaseUrl => "ApiBaseUrl";

public string ADB2CTenantName => "blogdemoorg.onmicrosoft.com";
public string ADB2CHostName => "blogdemoorg.b2clogin.com";
public string ADB2CClientId => "85xxxxxx-xxxx-xxxx-xxxx-xxxxxxxxxx76";
public string ADB2CPolicySignUpSignIn => "B2C_1_BlogDemoSusi";
public string ADB2CPolicyEditProfile => "ADB2C.PolicyEditProfile";
public string ADB2CPolicyResetPassword => "ADB2C.PolicyResetPassword";
public string ADB2CRedirectUri => "blogdemo://auth";
public string[] ADB2CScopes =>
    new string[] { "openid", "offline_access" };
public string ADB2CAuthorityBase =>
    $"https://{ADB2CHostName}/tfp/{ADB2CTenantName}/";
public string ADB2CAuthoritySignUpSignIn =>
    $"{ADB2CAuthorityBase}{ADB2CPolicySignUpSignIn}";
public string ADB2CAuthorityEditProfile =>
    $"{ADB2CAuthorityBase}{ADB2CPolicyEditProfile}";
public string ADB2CAuthorityResetPassword =>
    $"{ADB2CAuthorityBase}{ADB2CPolicyResetPassword}";
public string ADB2CiOSKeychainGroup => "com.obq.adb2cdemo";- Instance in the Api appsettings json should be set to the the hostname from the app code
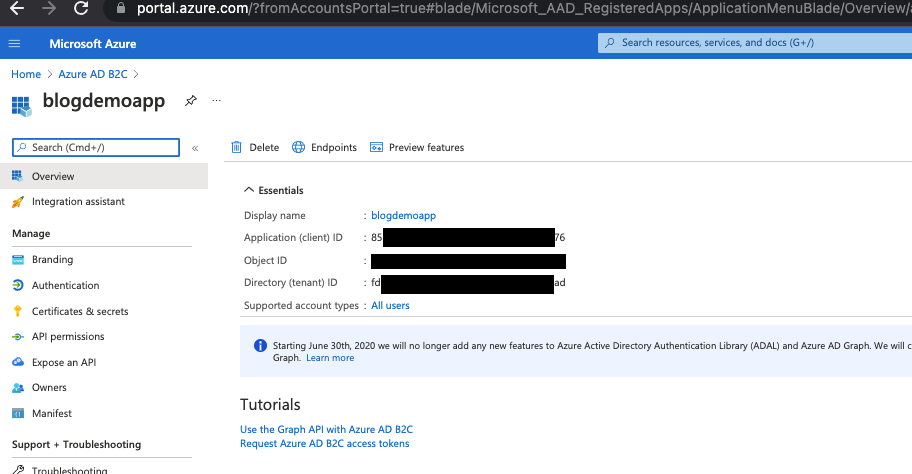
- ClientId needs to be set to the Application (client) ID of the app that you have registered under Azure AD B2C

- Domain in the Api appsettings.json should be set to the tenant name from the app code
- SignUpSignInPolicyId can be set to the same value that we use for this in the app
We also need to add:
- TenantId, which should be set to the Directory (tenant) ID of the app that you have registered under Azure AD B2C
- Scope
This value can be found here:
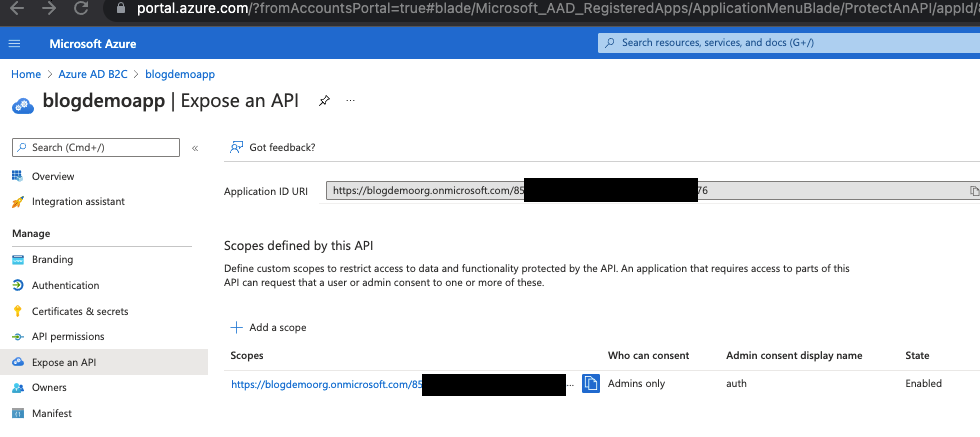
https://blogdemoorg.onmicrosoft.com/85[REDACTED]76/auth
- CallbackPath
This can be set to: /signin-oidc
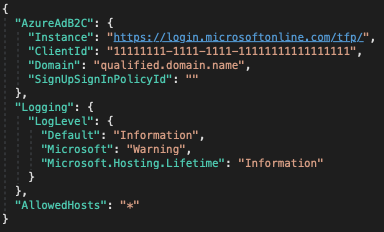
All up your appsettings.json file should now look like this:
{
  "AzureAdB2C": {
    "Instance": "https://blogdemoorg.b2clogin.com",
    "ClientId": "85xxxxxx-xxxx-xxxx-xxxx-xxxxxxxxxx76",
    "Domain": "blogdemoorg.onmicrosoft.com",
    "SignUpSignInPolicyId": "B2C_1_BlogDemoSusi",
    "TenantId": "fdxxxxxx-xxxx-xxxx-xxxx-xxxxxxxxxxad",
    "Scope": "https://blogdemoorg.onmicrosoft.com/85xxxxxx-xxxx-xxxx-xxxx-xxxxxxxxxx76/auth",
    "CallbackPath": "/signin-oicd"
  },
  "Logging": {
    "LogLevel": {
      "Default": "Information",
      "Microsoft": "Warning",
      "Microsoft.Hosting.Lifetime": "Information"
    }
  },
  "AllowedHosts": "*"
}
That's it! You have now enabled AD B2C authentication in your Api. You'll see that we still have a commented out line in the Get method here:
static readonly string[] scopeRequiredByApi = new string[] { "access_as_user" };

...

public IEnumerable<WeatherForecast> Get()
{
    //HttpContext.VerifyUserHasAnyAcceptedScope(scopeRequiredByApi);

    var rng = new Random();
    return Enumerable.Range(1, 5).Select(index => new WeatherForecast
    {
        Date = DateTime.Now.AddDays(index),
        TemperatureC = rng.Next(-20, 55),
        Summary = Summaries[rng.Next(Summaries.Length)]
    })
    .ToArray();
}
You can use this to restrict Api access to only users with the defined scope.
Next we'll update the app to call this Api. That's coming soon in the next post. Until then, happy coding!