2. Write a Xamarin.Forms app that uses Azure AD B2C

This is the second post in a series that covers creating a Xamarin.Forms app and an API, both secured by Azure AD B2C, detailing the Azure configuration and the necessary code. It assumes that you've already completed the Azure AD B2C configuration detailed in the first post in this series.
TL;DR - the code is here: https://github.com/AlecDTucker/ADB2C-XF-API
The screenshots you'll see in this post are from Visual Studio for Mac. The steps should be similar, if not identical, using Visual Studio for Windows.
Also, in common with other posts in this series, you'll see redacted ids. See my comments and links on this in the previous post. There should be enough information visible in these ids to distinguish between them.
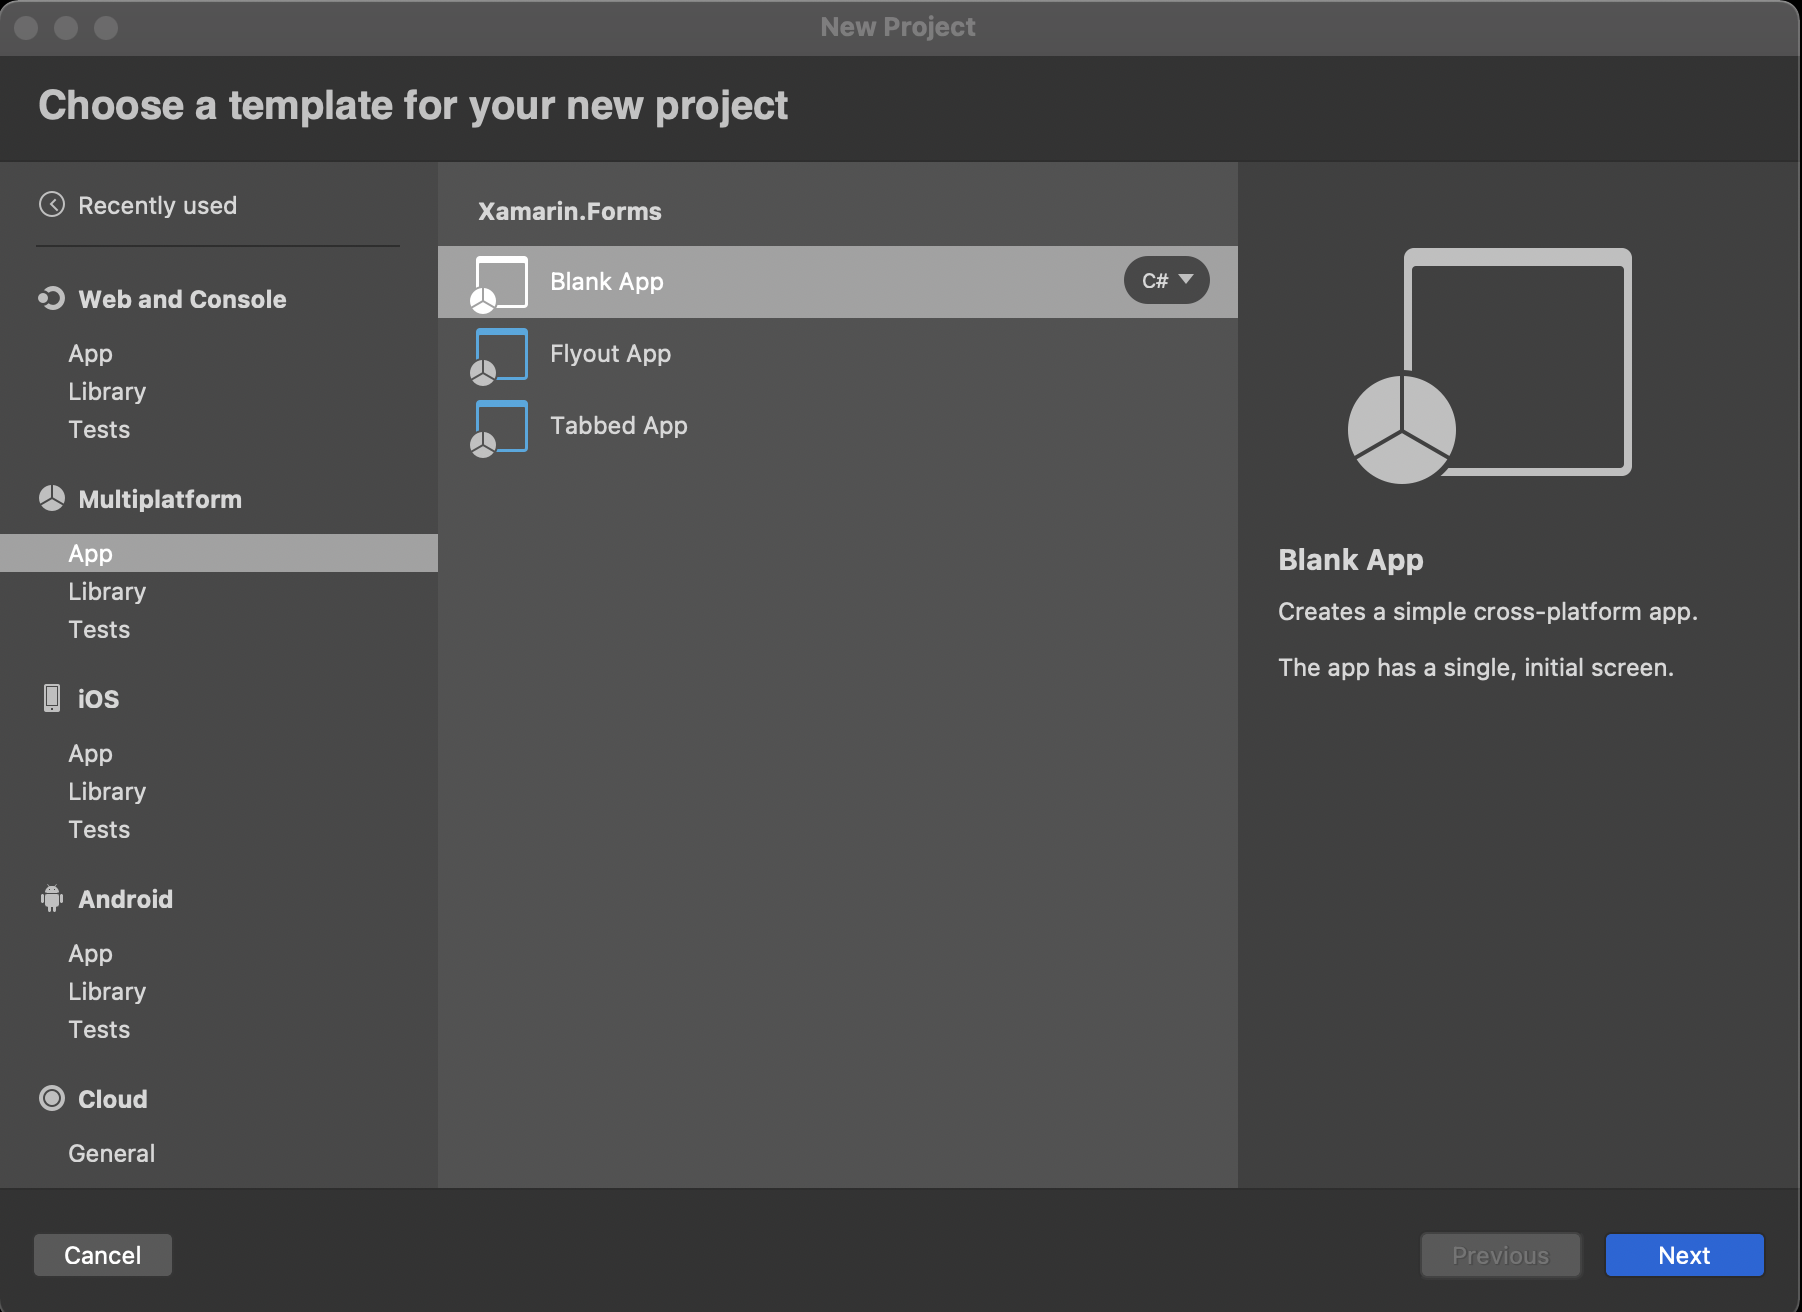
We'll take this right from the start, from File --> New Project. Select a new, blank Xamarin.Forms app:
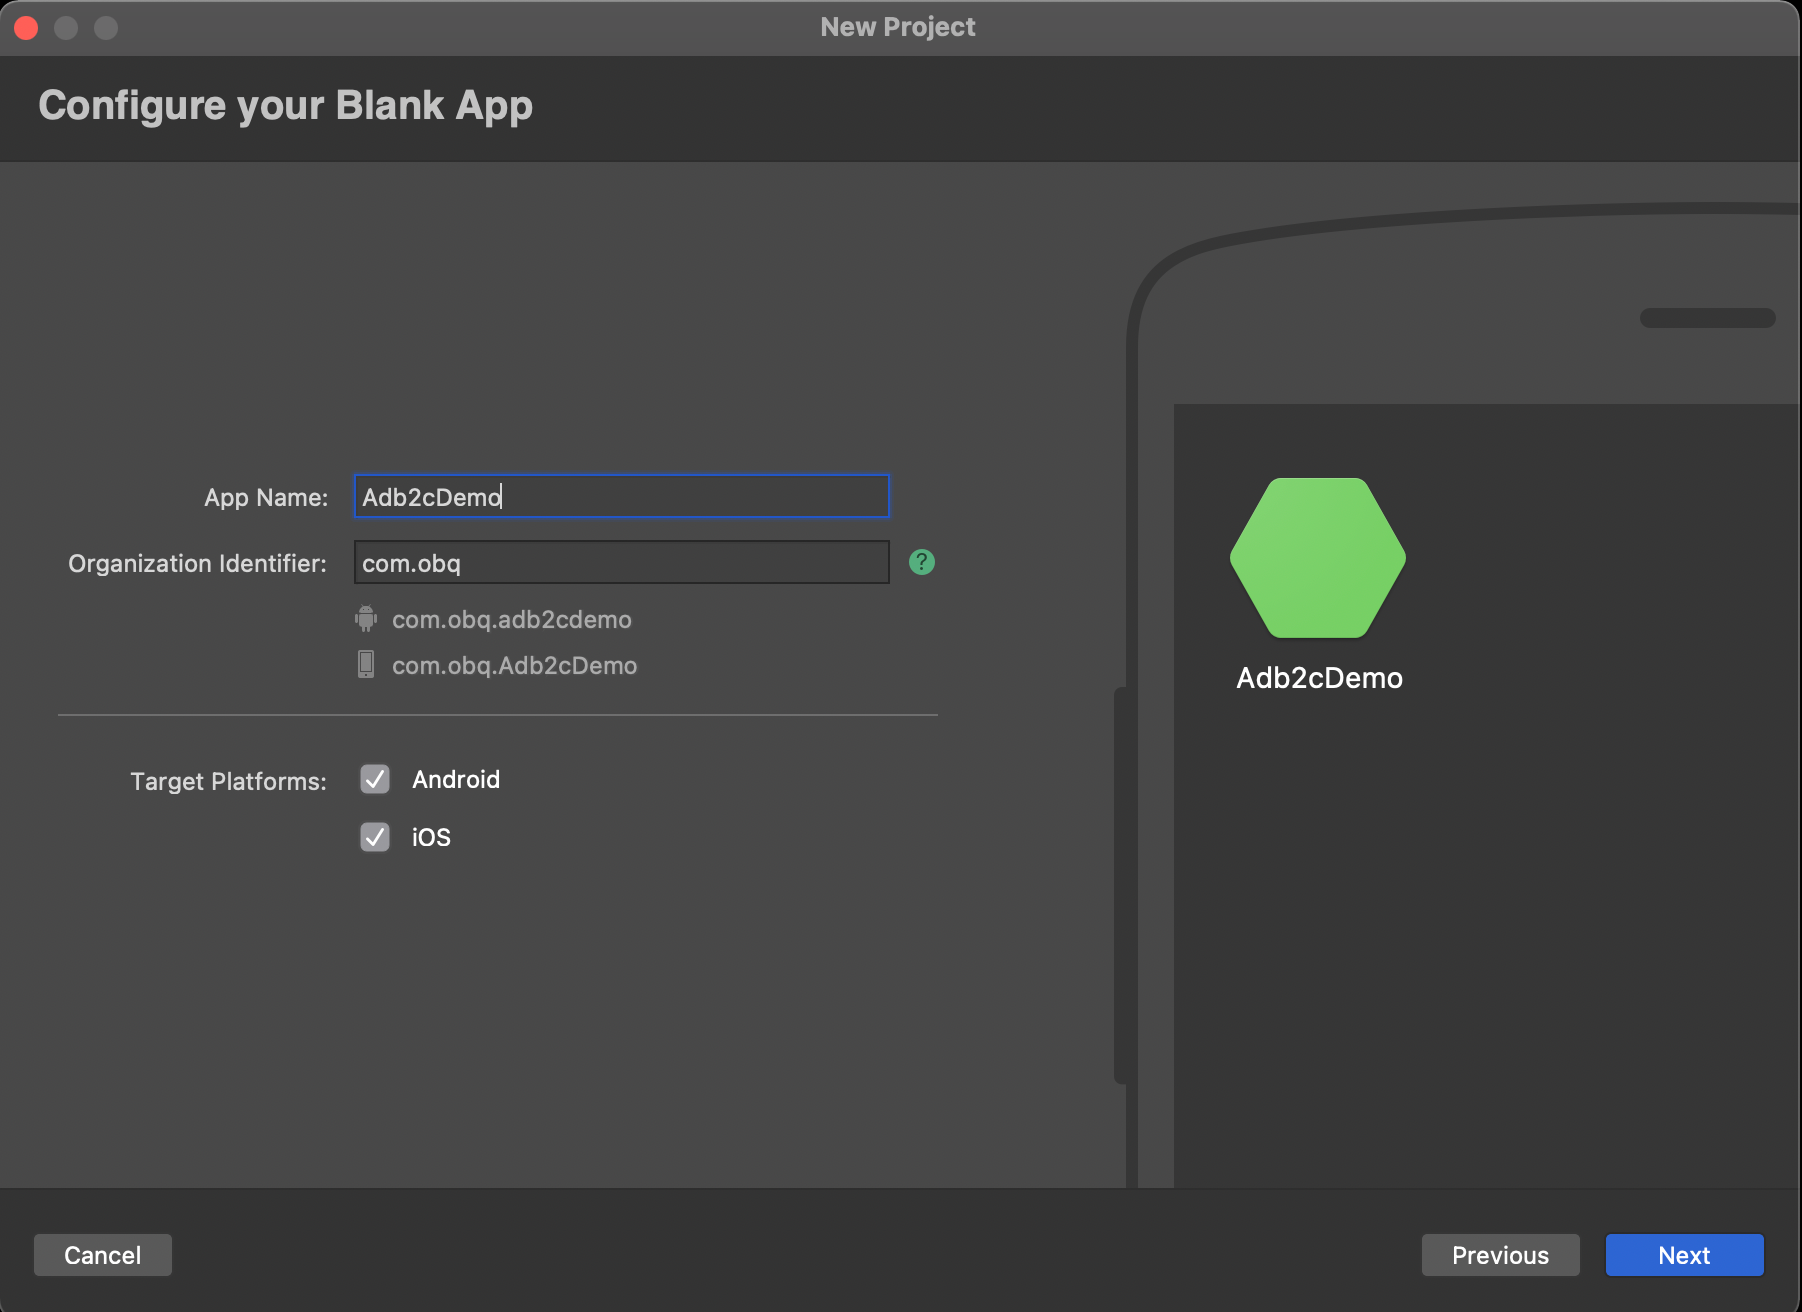
...choosing a name and identifier:
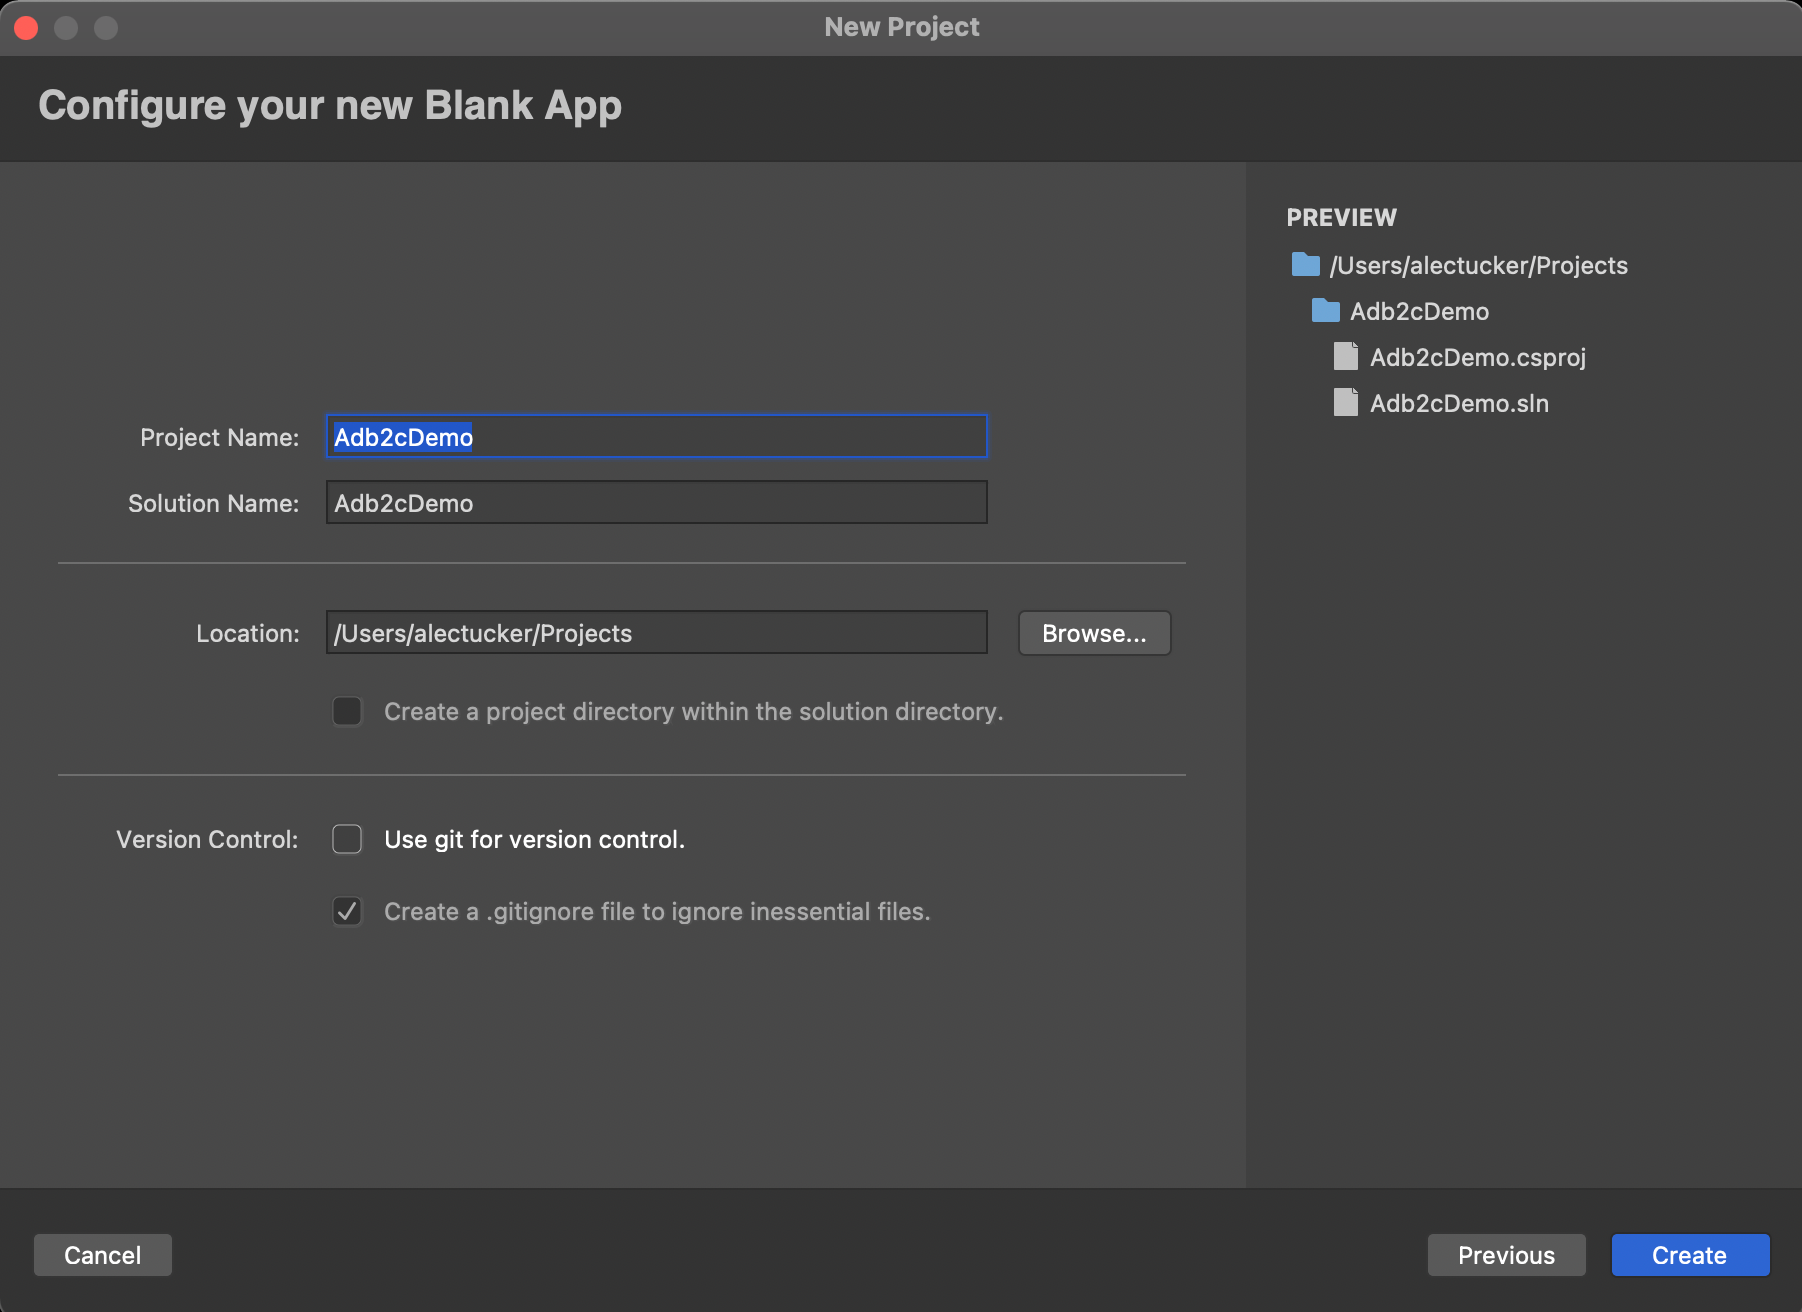
It's a good idea to run that straight away and confirm there are no issues with your environment setup.
For this app we're going to use a single view, initially with just two buttons - login and logout. We'll be using Mvvm, but with a minimal implementation so as not to detract from what I'm trying to demostrate. This view will therefore have an associated view model, and we'll need a service class to perform the authentication.
So let's start with the view. Add a new folder, "Views" to the .Net Standard project. Now add a new file to the folder to hold a Xamarin.Forms Xaml Content Page. In Visual Studio for Mac that looks like this:
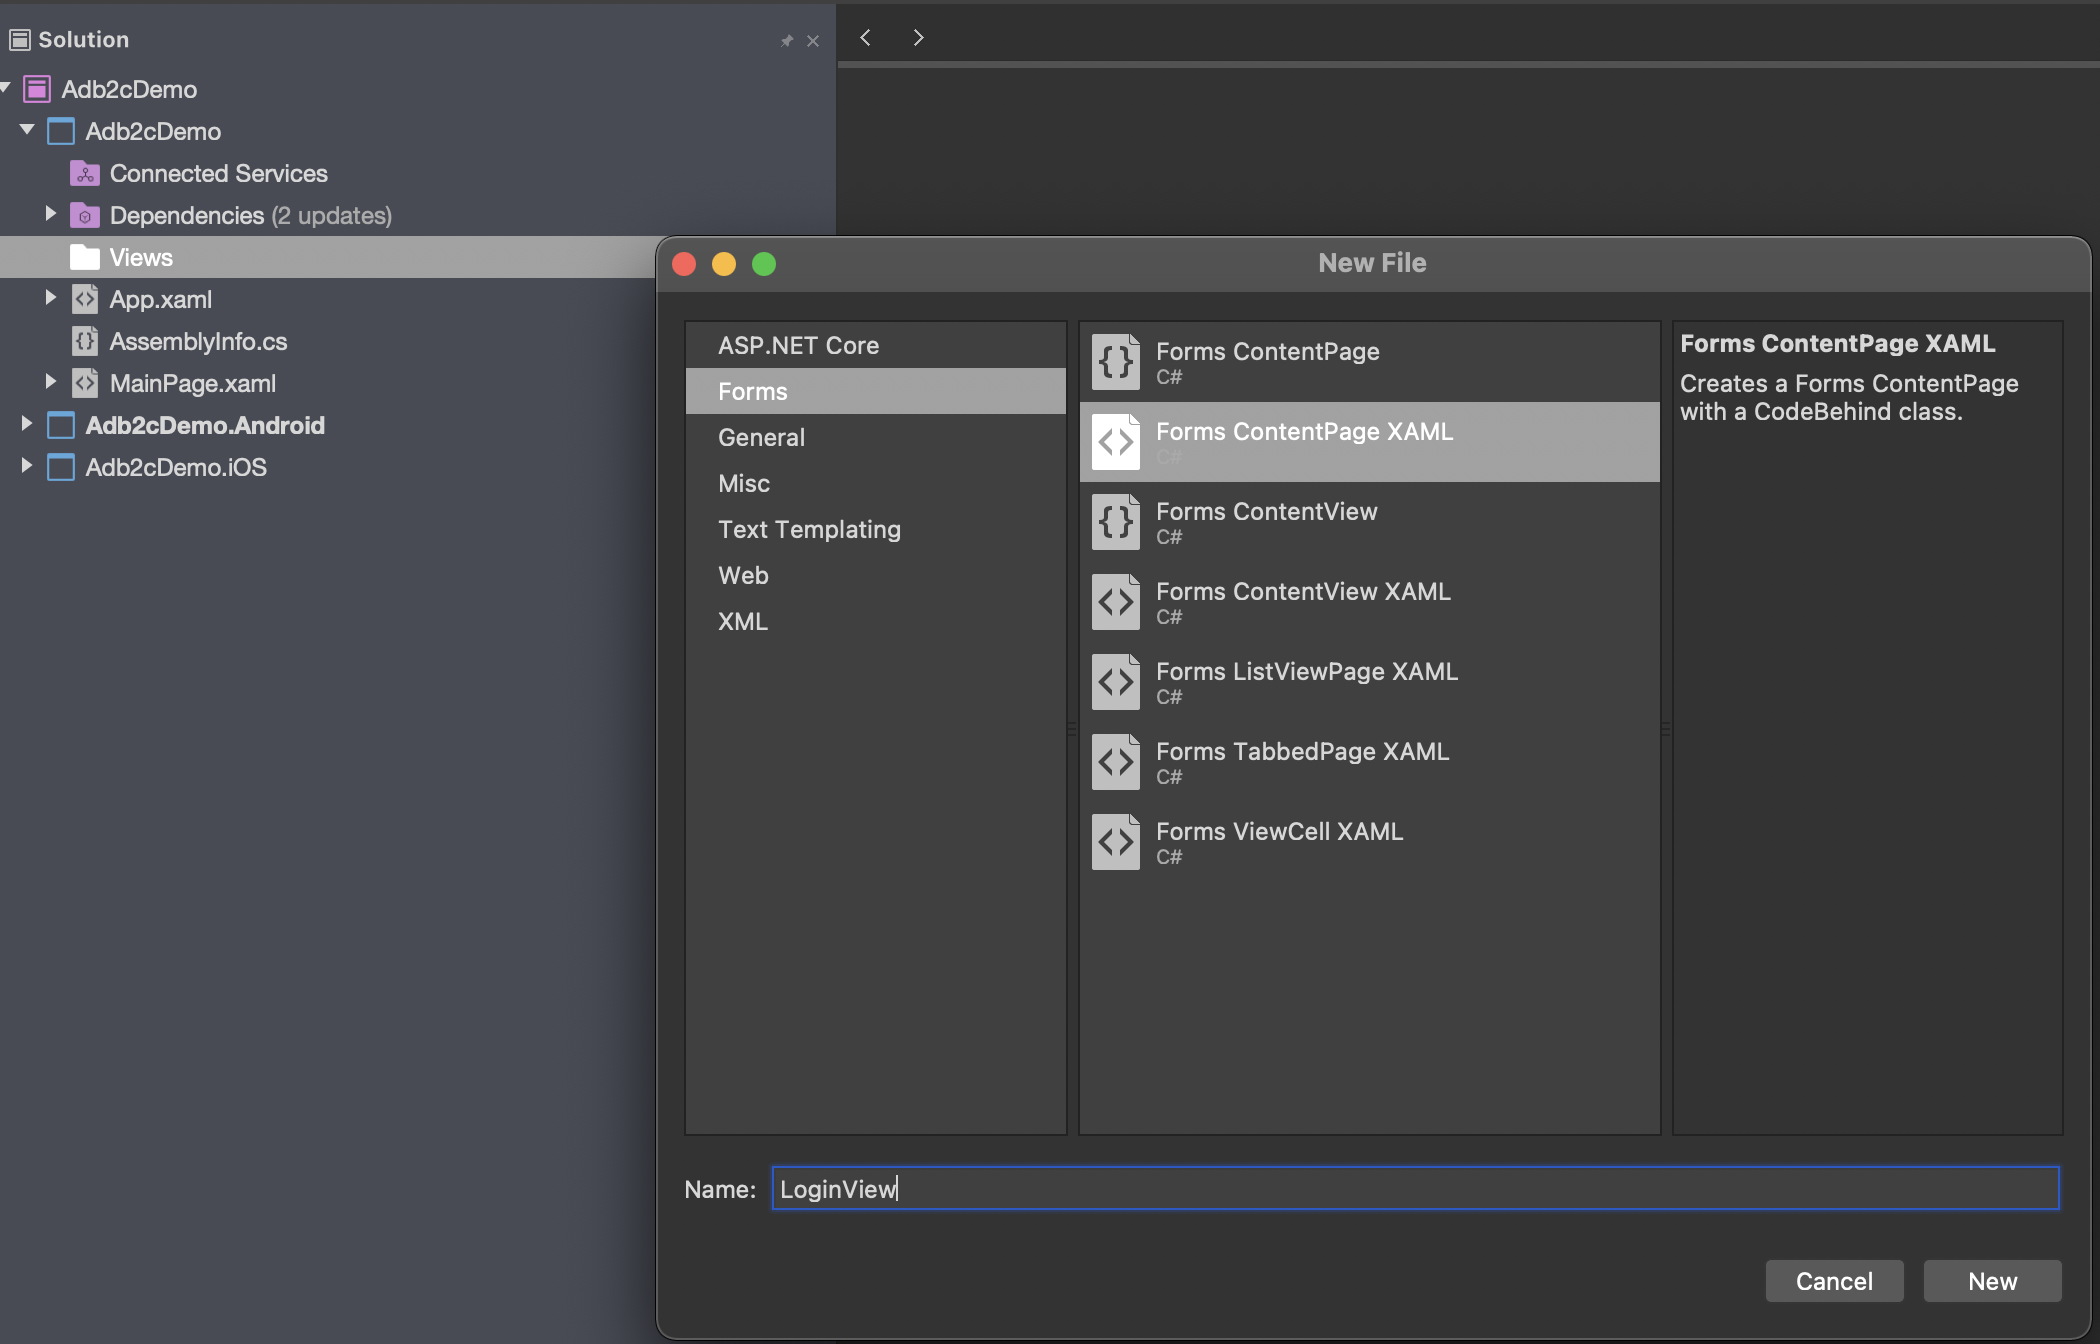
We'll call it LoginView.
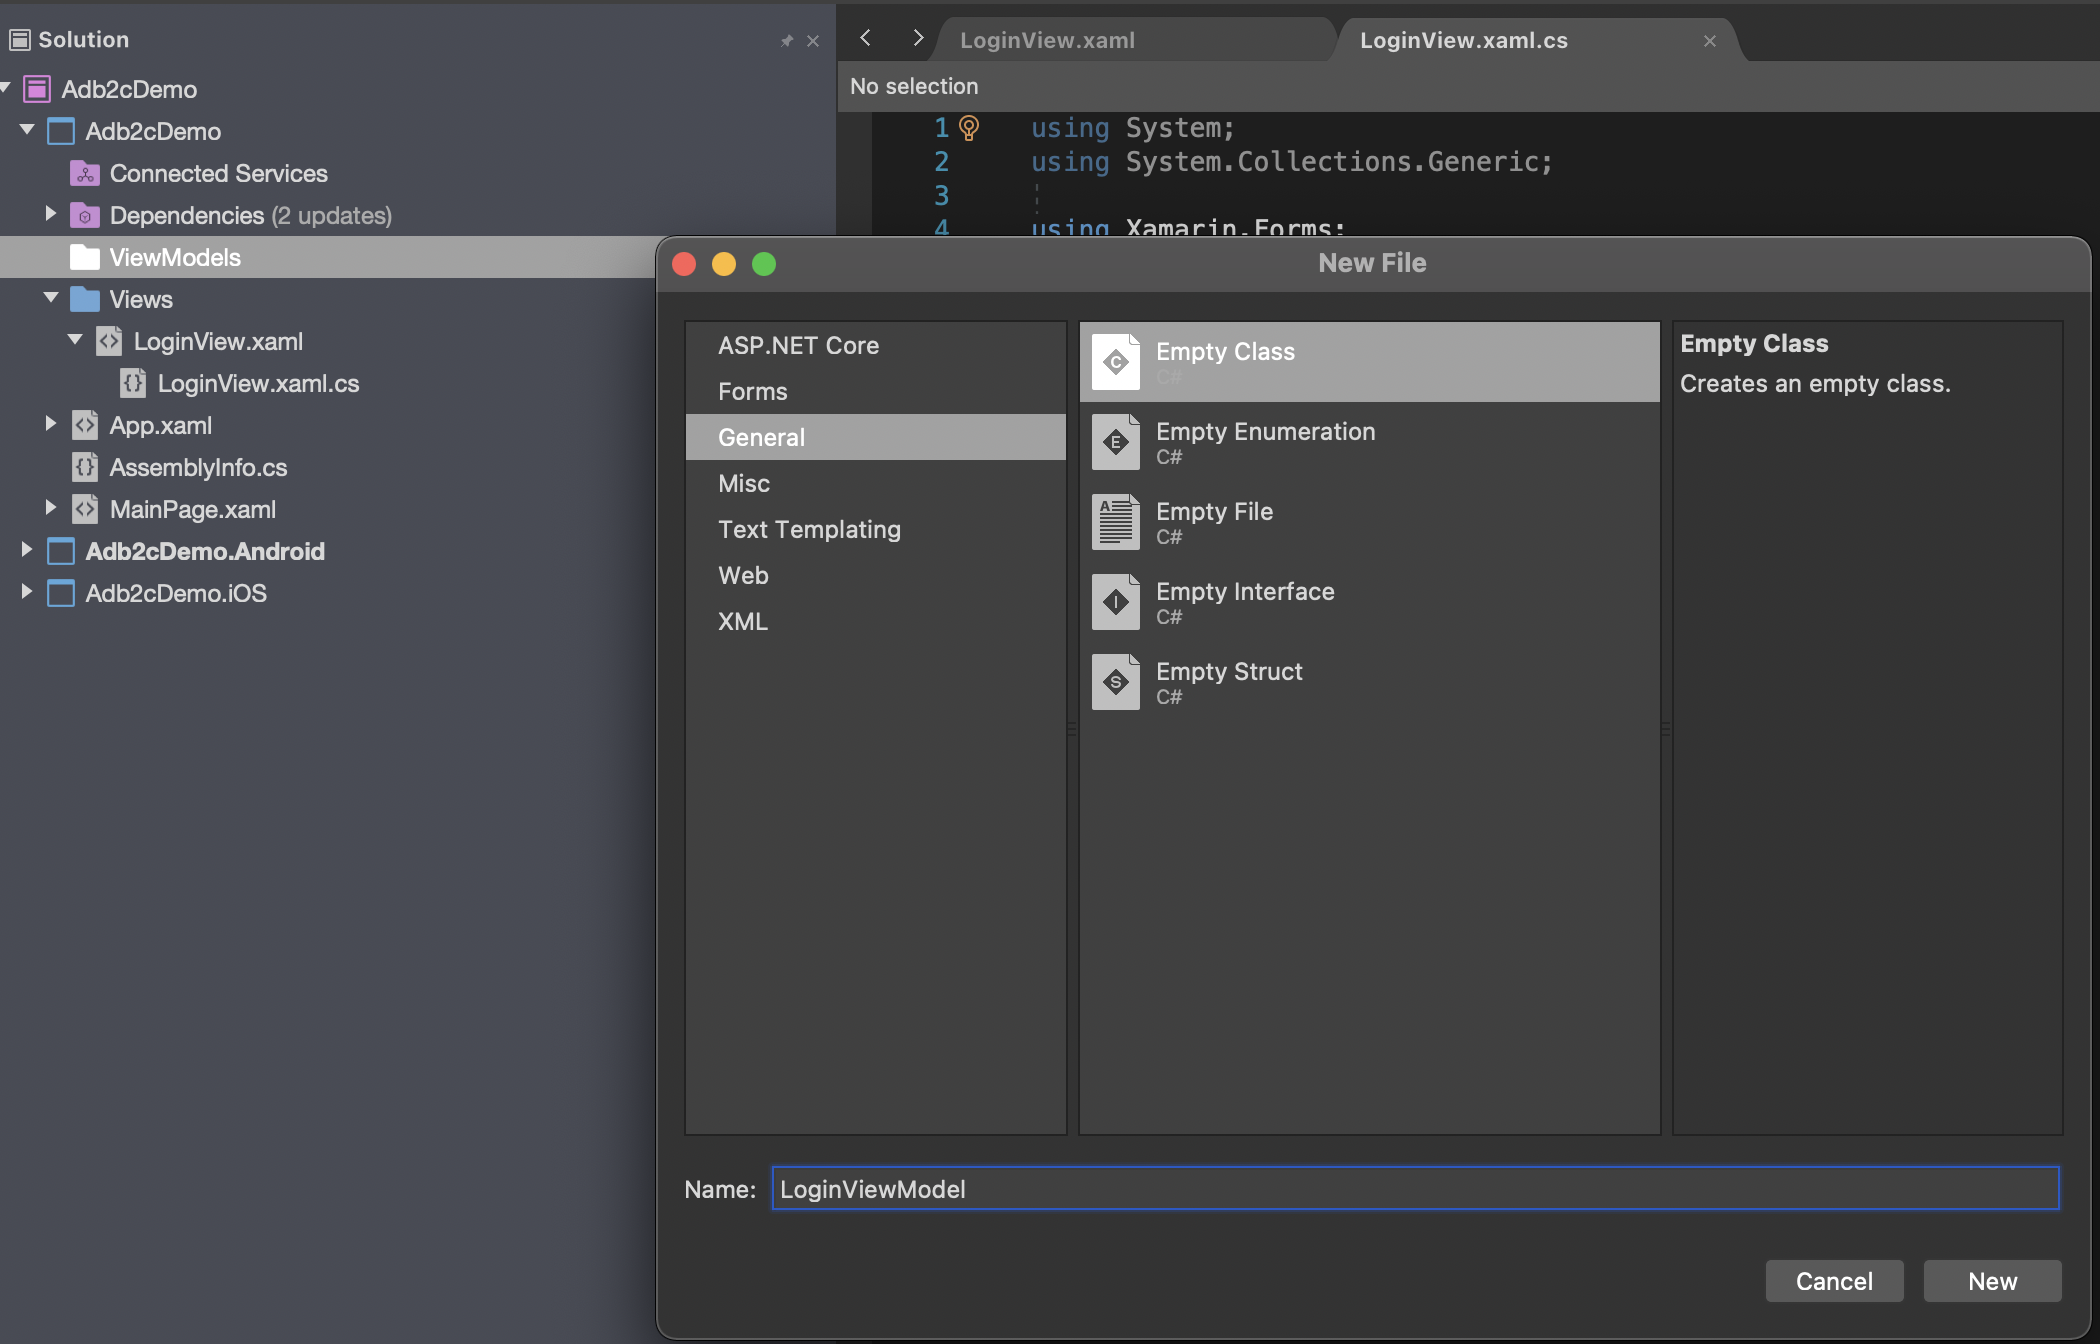
Next we'll create the view model, starting with a ViewModels folder, and then a new class in there called LoginViewModel:
As I said earlier, the view will be really basic. Edit the xaml to look like this:
<StackLayout
        VerticalOptions="CenterAndExpand"
        HorizontalOptions="CenterAndExpand">
    <Button Text="Login" Command="{Binding LoginCommand}"/>
    <Button Text="Logout" Command="{Binding LogoutCommand}"/>
</StackLayout>
You can see that we've added two buttons and bound them to associated commands in the view model, so the next step will be to add those commands into the LoginViewModel class.
private ICommand _loginCommand = null;
public ICommand LoginCommand =>
    _loginCommand = _loginCommand
    ?? new Command(async () => await DoLoginCommand());

private async Task DoLoginCommand()
{

}

private ICommand _logoutCommand = null;
public ICommand LogoutCommand =>
    _logoutCommand = _logoutCommand
    ?? new Command(async () => await DoLogoutCommand());

private async Task DoLogoutCommand()
{

}
If Visual Studio hasn't already prompted you then add the following using statements to support this code:
using System.Threading.Tasks;
using System.Windows.Input;
using Xamarin.Forms;
Now because we're not using a full blown Mvvm framework, or doing anything fancy to link the view with the view model, let's just do that manually in the code behind of the view. In practice, you'll have something a little more sophisticated than this in place but for now add this to your code behind - LoginView.xaml.cs:
using Adb2cDemo.ViewModels;
using Xamarin.Forms;

namespace Adb2cDemo.Views
{
    public partial class LoginView : ContentPage
    {
        public LoginView()
        {
            InitializeComponent();
            this.BindingContext = new LoginViewModel();
        }
    }
}
Again, note the using statements that you'll need.
One final step in this initial section is to edit App.xaml.cs to launch the app using our new, beautifully designed screen, like this:
public partial class App : Application
{
    public App()
    {
        InitializeComponent();

        MainPage = new LoginView();
    }
…
So now we have an app with a basic screen layout that's all wired up to its view model, but is not yet doing anything.
The more observant among you will notice that we've not implemented INotifyPropertyChanged in the view model - a fundamental step in any Mvvm app. For now at least, the screen is going to be so simple that it won't have any property bindings, so we can get away without it. Of course, as soon as you change the screen to do anything useful you will need this in place.
Before we start work on the authentication service class we need a couple of supporting tasks to be completed. First, we'll add a model class to hold our user context. Add a Models folder, and create a new class in there called UserContext:
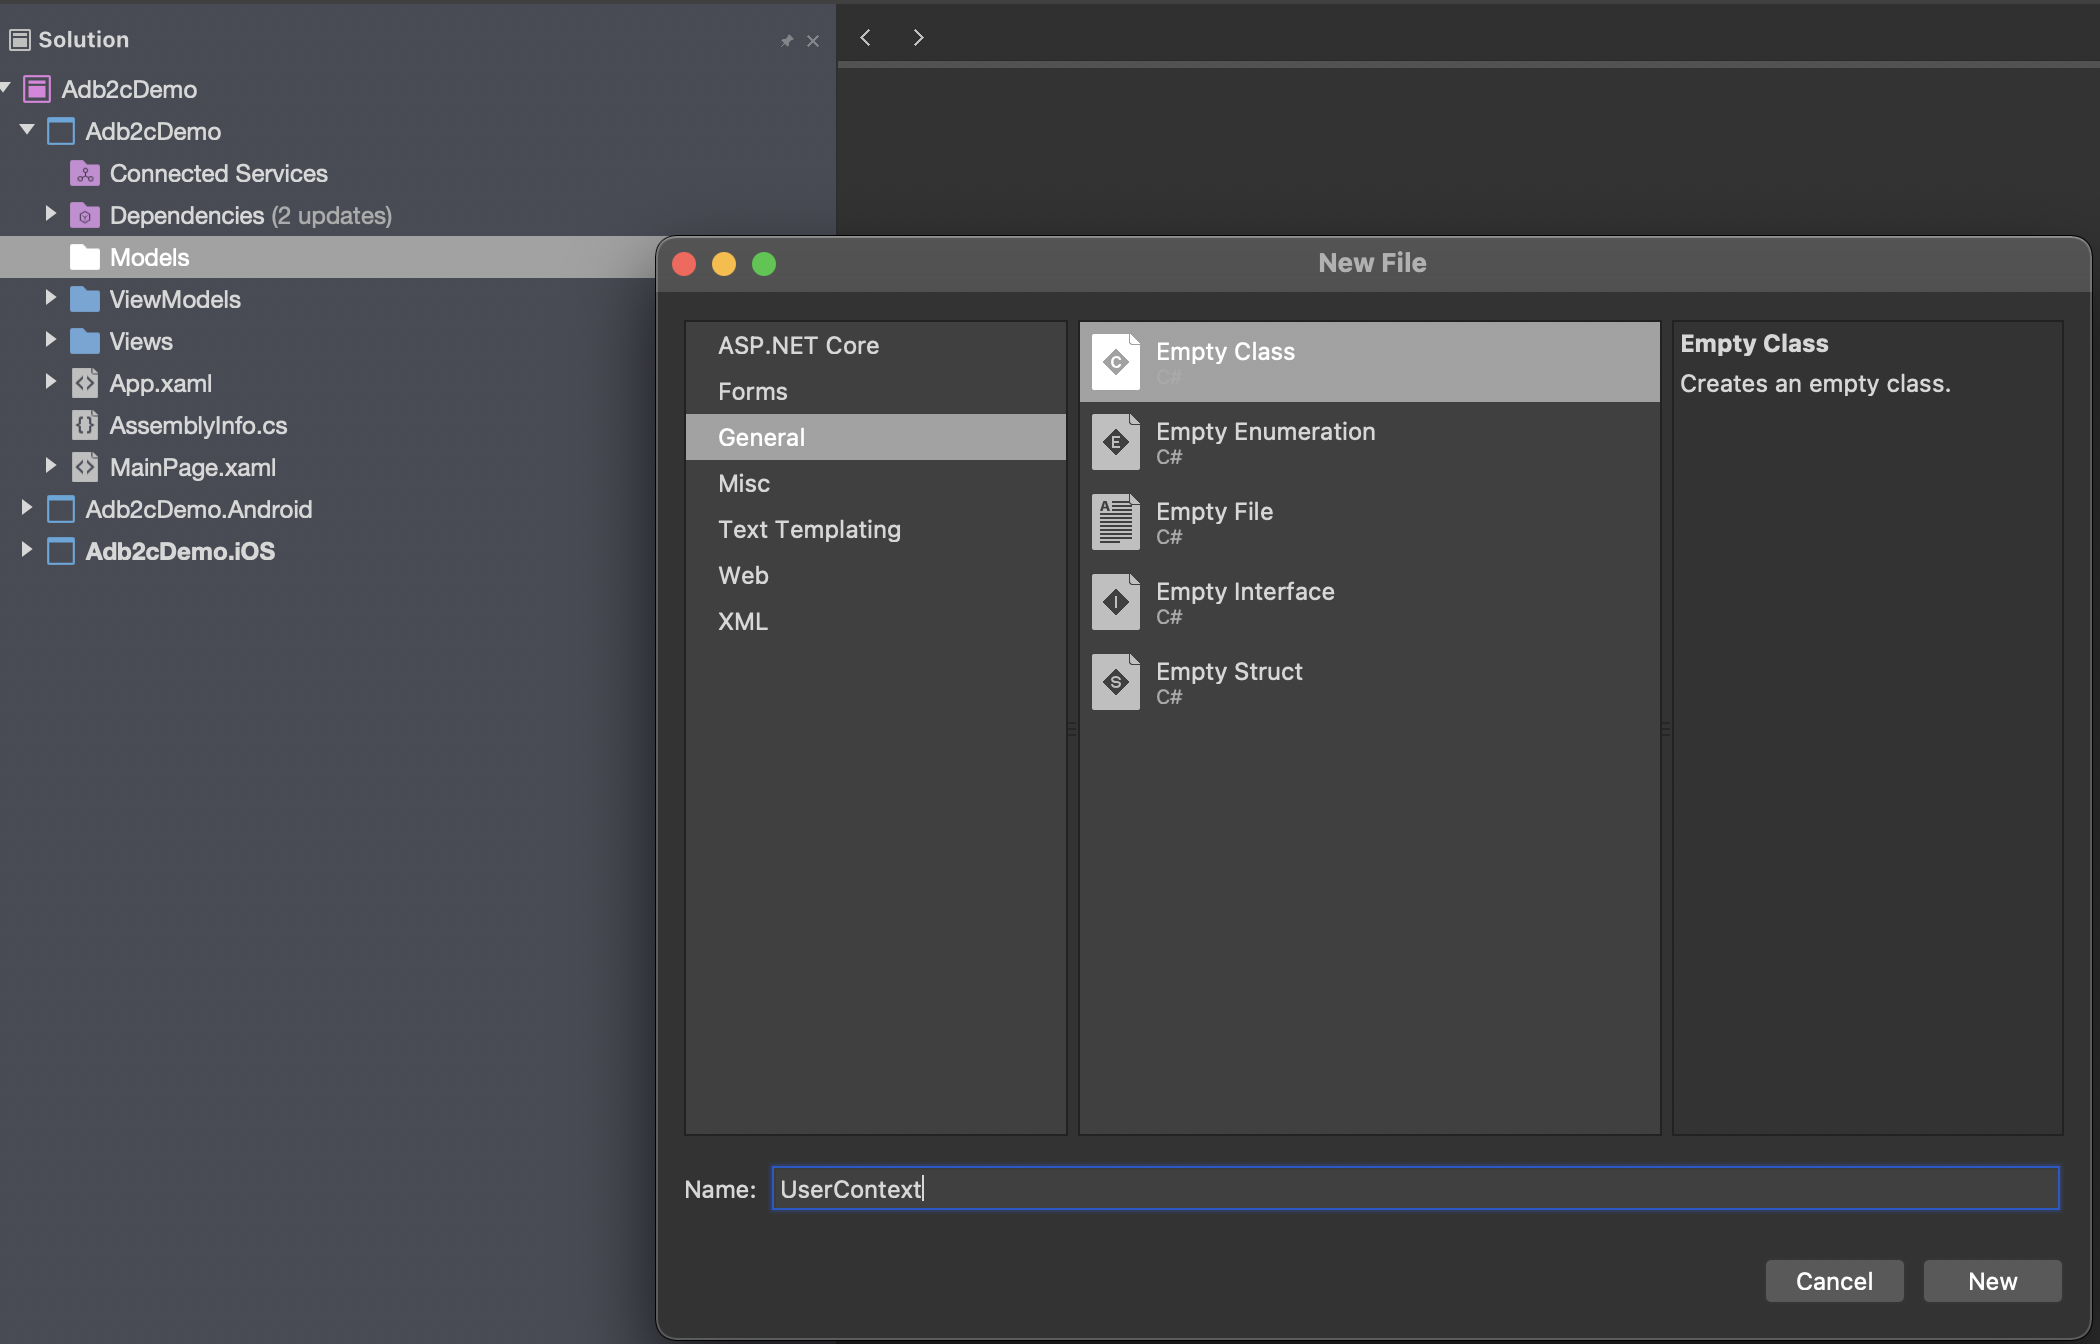
...which should contain the following:
public class UserContext
{
public string Name { get; internal set; }
public string UserIdentifier { get; internal set; }
public bool IsLoggedOn { get; internal set; }
public string GivenName { get; internal set; }
public string FamilyName { get; internal set; }
public string Province { get; internal set; }
public string PostalCode { get; internal set; }
public string Country { get; internal set; }
public string EmailAddress { get; internal set; }
public string JobTitle { get; internal set; }
public string StreetAddress { get; internal set; }
public string City { get; internal set; }
public string AccessToken { get; internal set; }
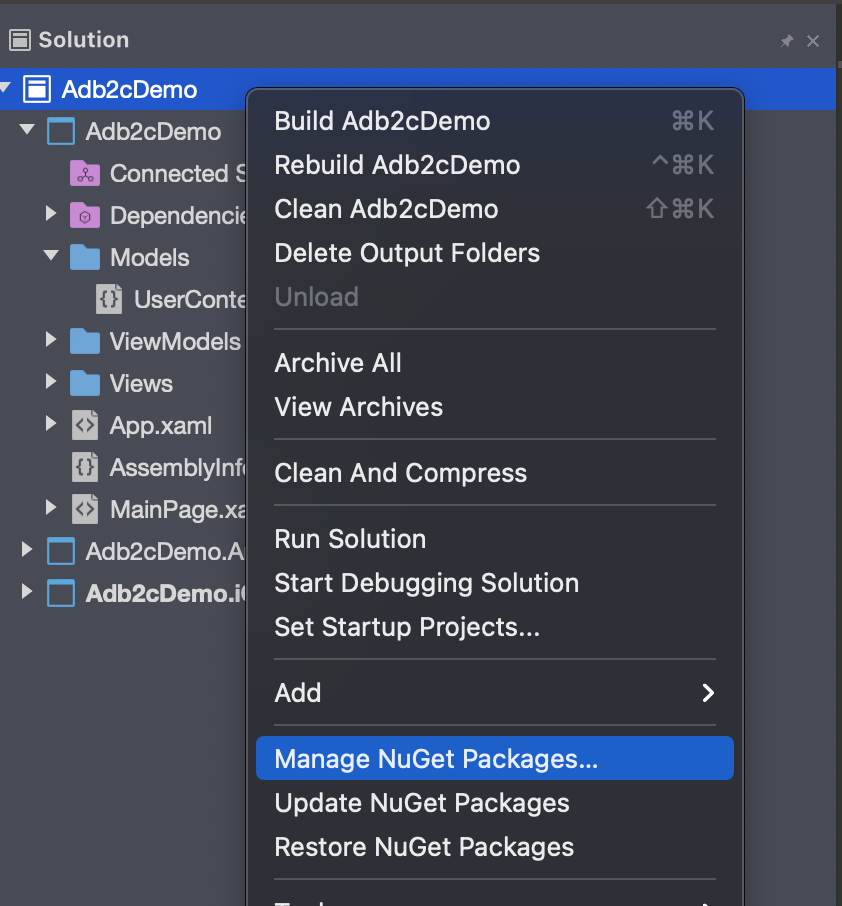
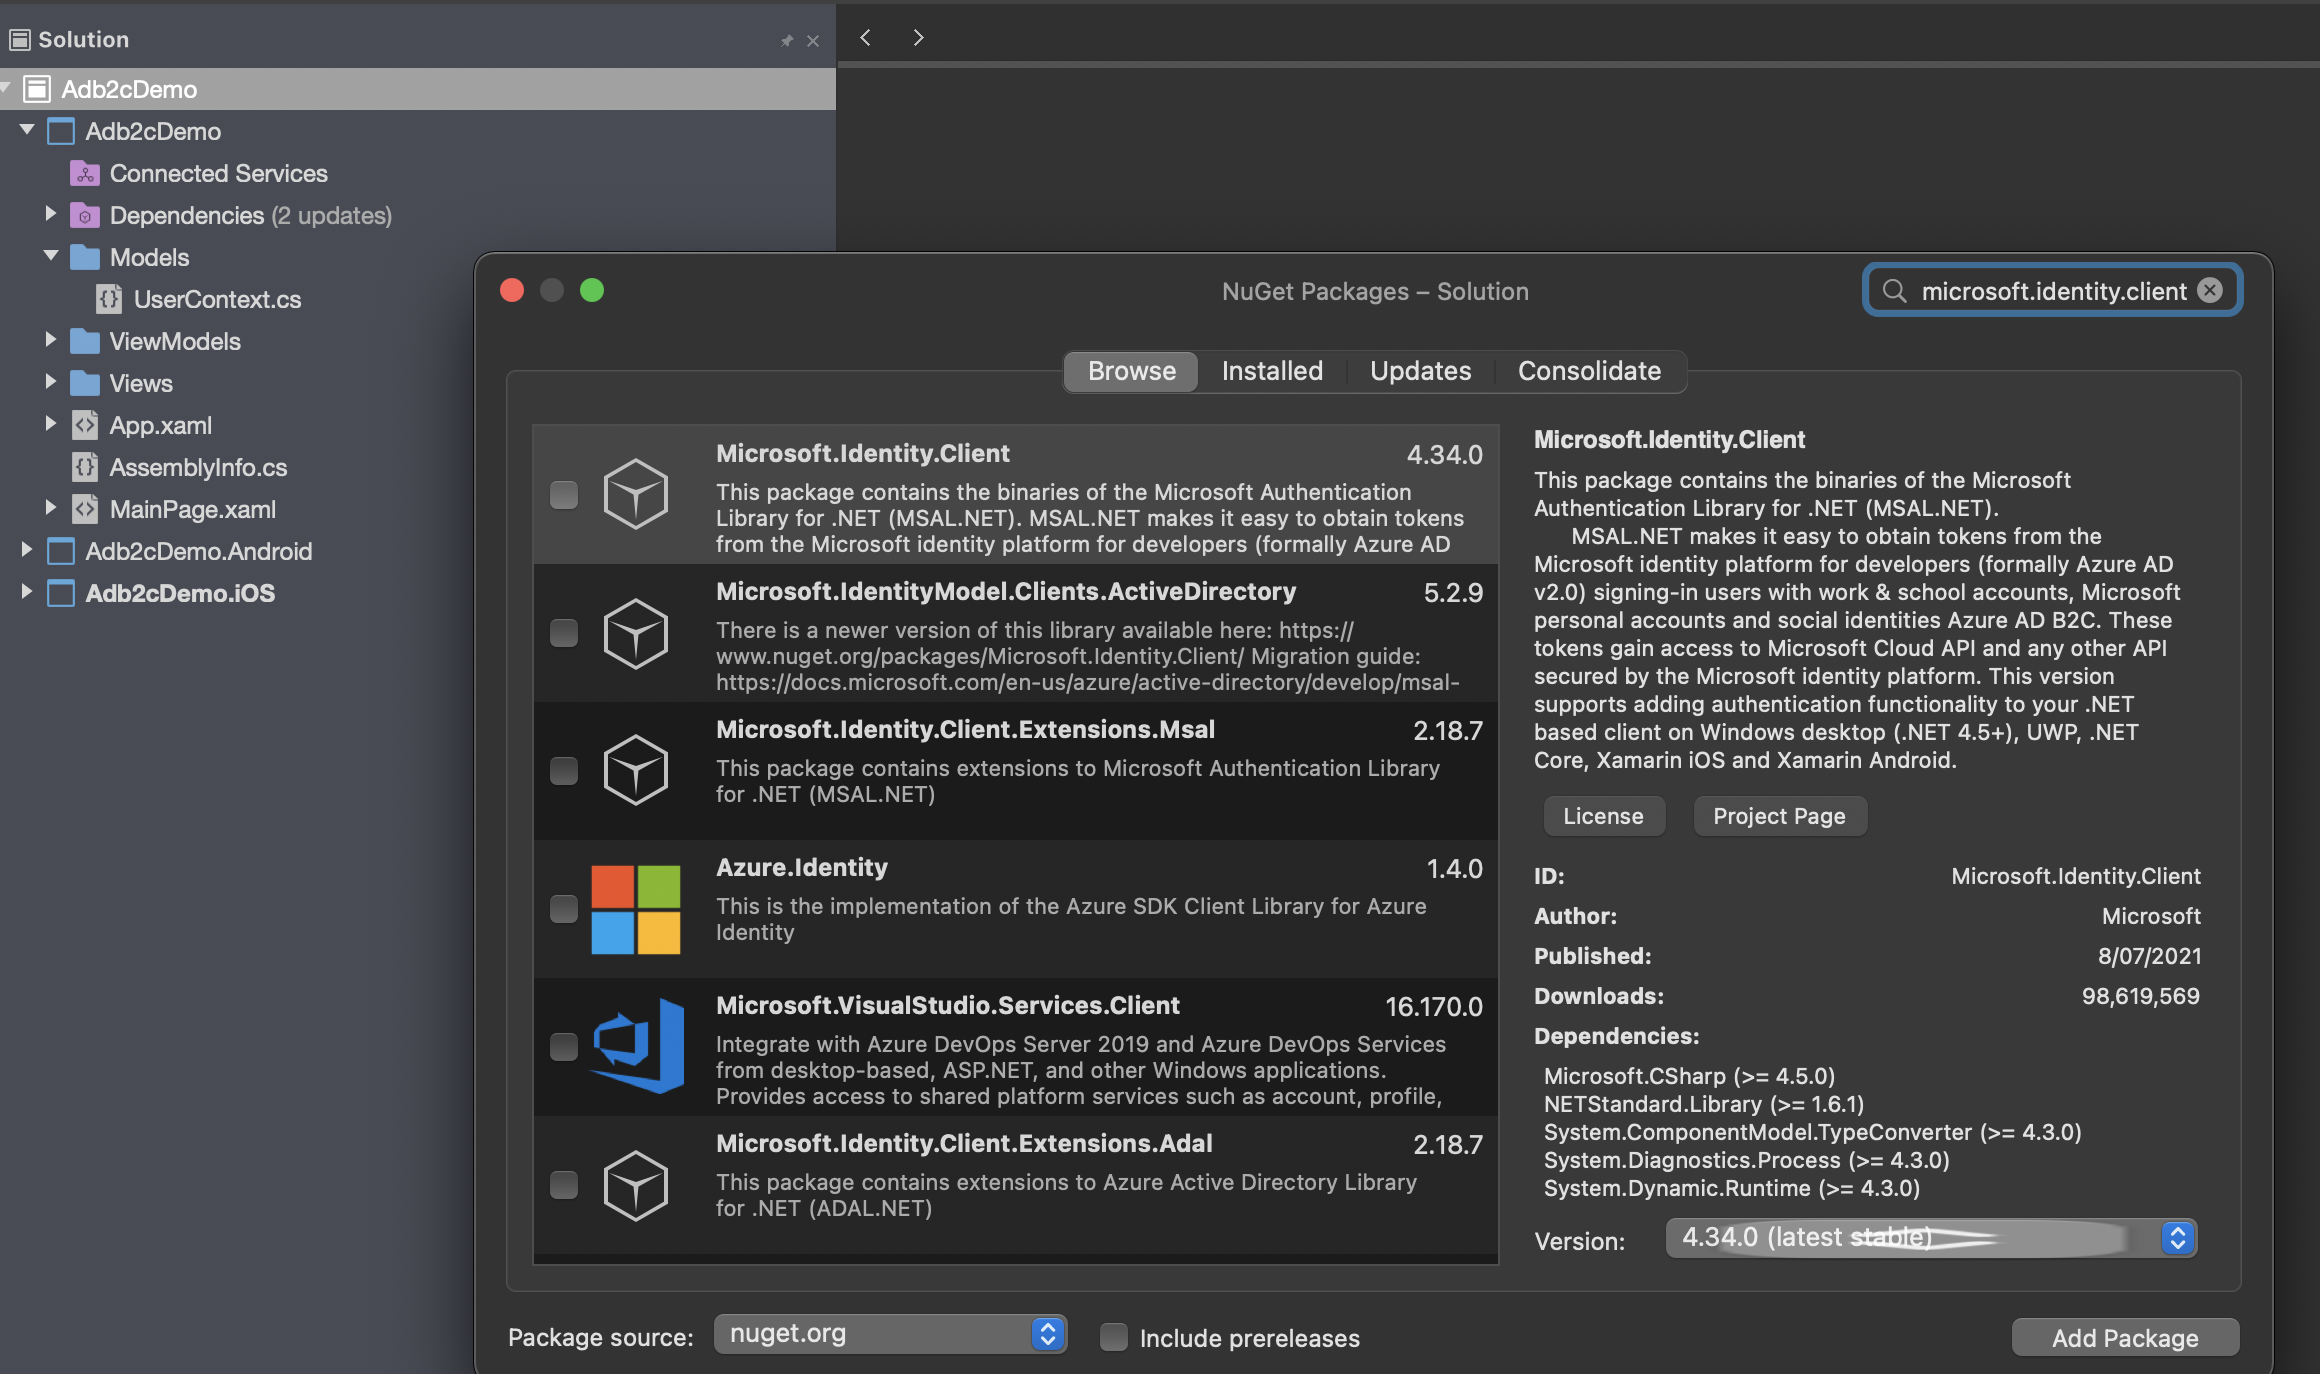
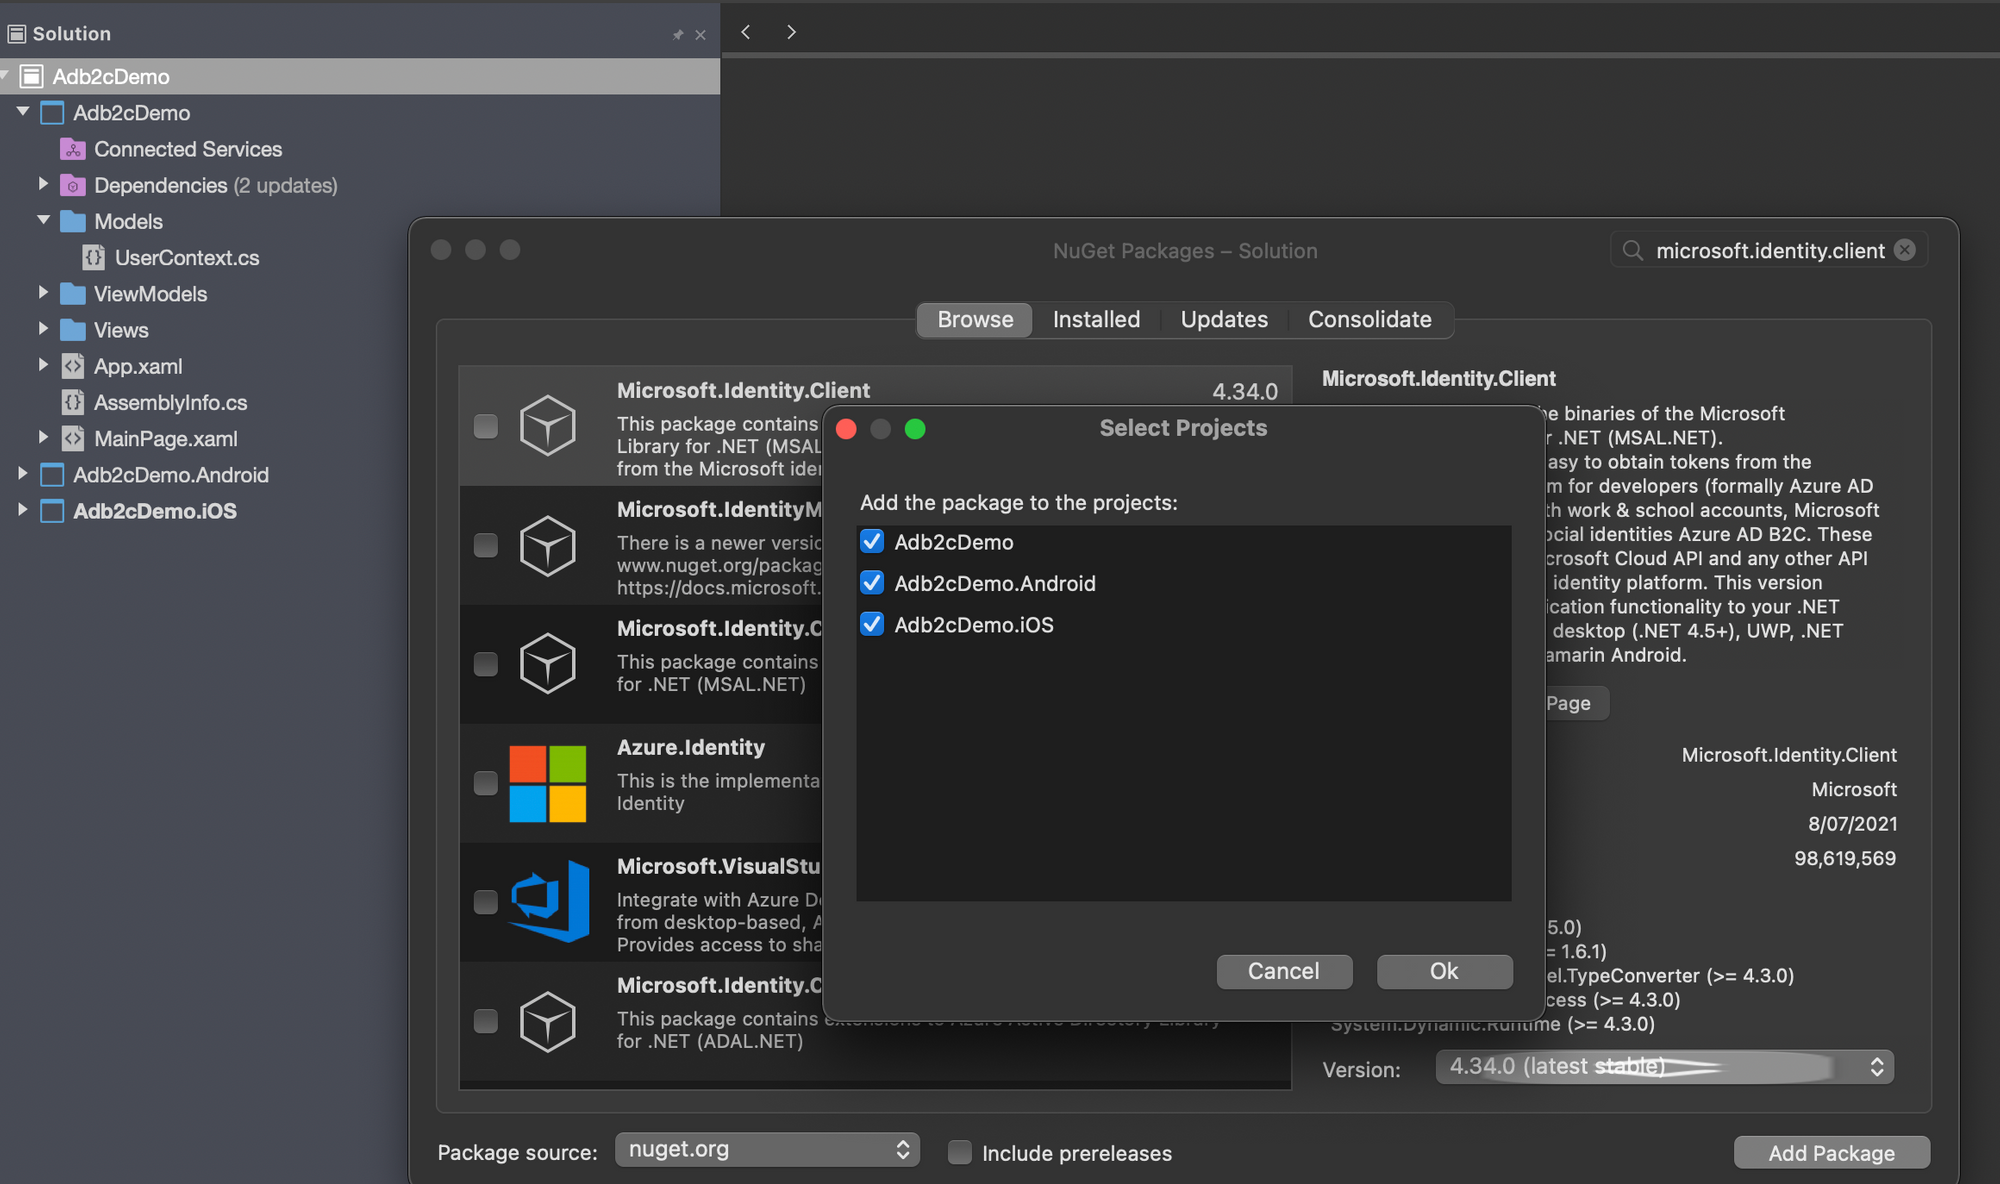
}Next we'll need to bring in the smarts of the Microsoft Authentication Library, or MSAL. Right click on the solution and select "Manage NuGet Packages", then find and install Microsoft.Identity.Client.
With that in place, there are now a few things that we need to add before we start on the actual auth code.
Let's look at iOS first:
In AppDelegate.cs we need to add the following:
public override bool OpenUrl(UIApplication app,
    NSUrl url, NSDictionary options)
{
    AuthenticationContinuationHelper
        .SetAuthenticationContinuationEventArgs(url);
    return true;
}
This is used once the auth flow has completed and control is returned to the app. It ensures that MSAL continues to handle the process within the app. Included in the smarts I referred to earlier is code to cache the access token securely. Supporting that on iOS requires some more specifics. First, keychain access must be enabled in Entitlements.plist, and your bundle identifier must be specified in the Keychain Groups.
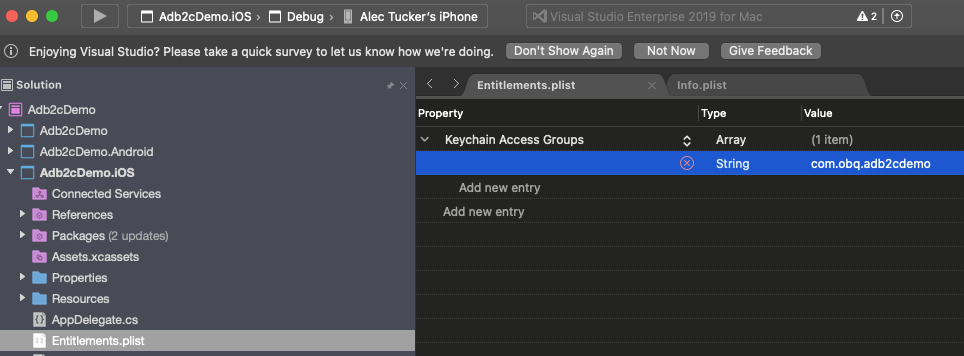
Next, right click on your iOS project and select Options and double check that Entitlements.plist is entered under Custom Entitlements:
Finally, you'll need to sign your app when running it on a physical device.
That's it for iOS, now what about Android?
In MainActivity.cs, change OnActivityResult to look like this:
protected override void OnActivityResult(
    int requestCode, Result resultCode, Intent data)
{
    base.OnActivityResult(requestCode, resultCode, data);
    AuthenticationContinuationHelper
        .SetAuthenticationContinuationEventArgs(
            requestCode, resultCode, data);
}
This serves the same purpose as the code we added into AppDelegate.cs on iOS, as described above. Now you'll need to add the following into your AndroidManifest.xml file:
<manifest xmlns:android="http://schemas.android.com/apk/res/android" android:versionCode="1" android:versionName="1.0" package="com.obq.adb2cdemo">
 <uses-sdk android:minSdkVersion="21" android:targetSdkVersion="30" />
 <application android:label="Adb2cDemo.Android" android:theme="@style/MainTheme">
  <activity android:name="microsoft.identity.client.BrowserTabActivity">
   <intent-filter>
    <action android:name="android.intent.action.VIEW" />
    <category android:name="android.intent.category.DEFAULT" />
    <category android:name="android.intent.category.BROWSABLE" />
    <data android:scheme="blogdemo" android:host="auth" />
   </intent-filter>
  </activity>
 </application>
 <uses-permission android:name="android.permission.ACCESS_NETWORK_STATE" />
</manifest>
The section we're interested in here is the application node. You'll need to add the contents of that to match the code above. Note particularly the following line:
<data android:scheme="blogdemo" android:host="auth" />This needs to match the redirect URI that we're using. You may have seen Xamarin Android app examples that look like this instead:
<data android:scheme="msal[your app id here]" android:host="auth" />This would work if we were using "msal[your app id here]://auth" (e.g., "msal11111111-1111-1111-1111-111111111111://auth") as our redirect URI, but we're not. We're using "blogdemo://auth", so that's what we need here.
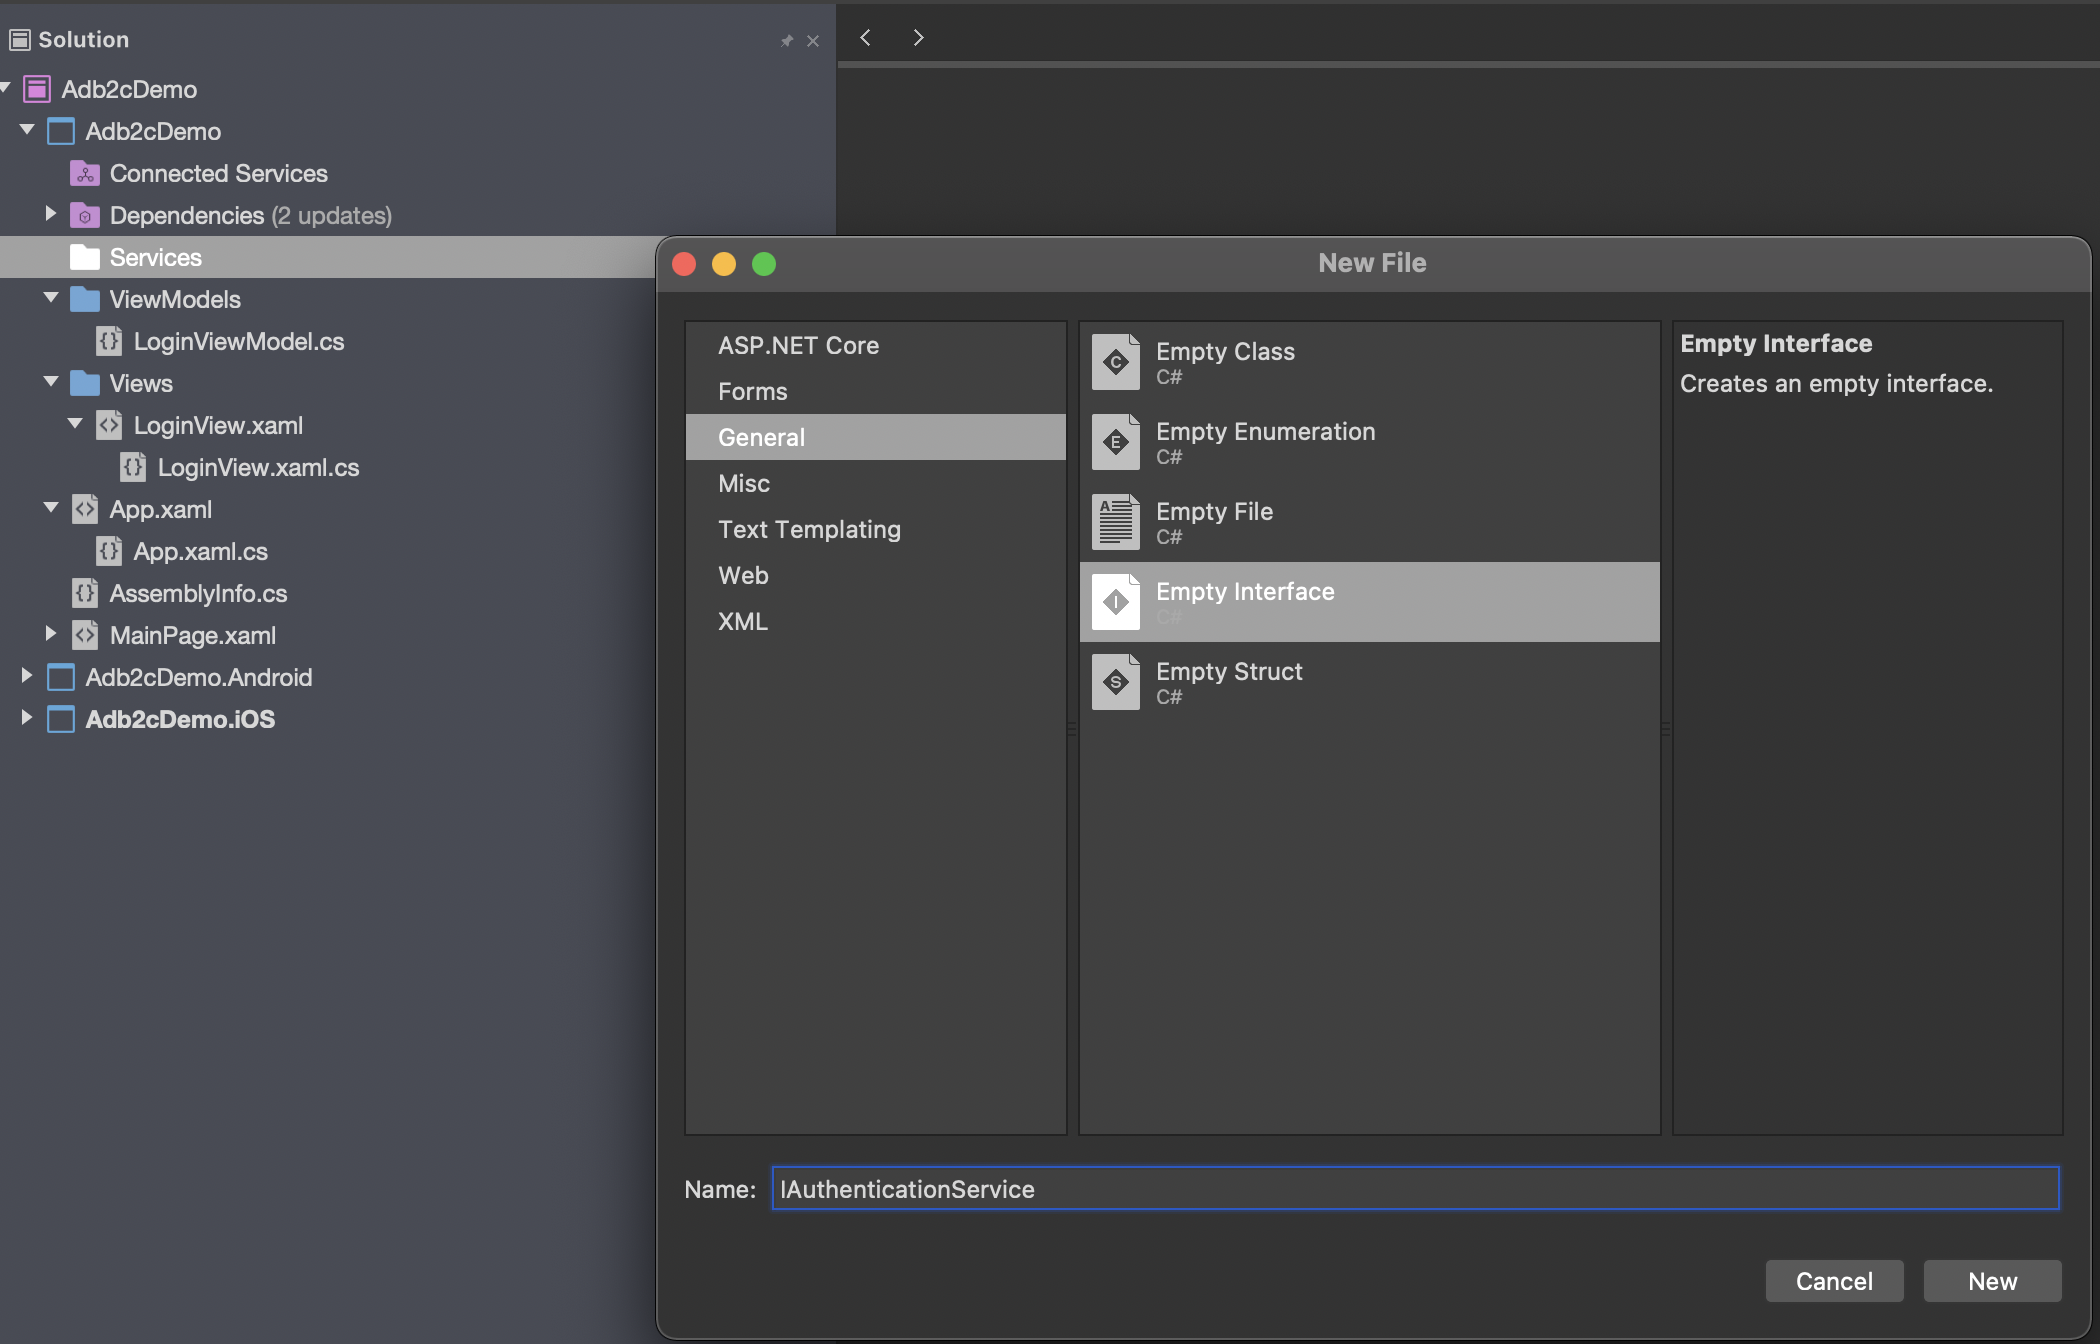
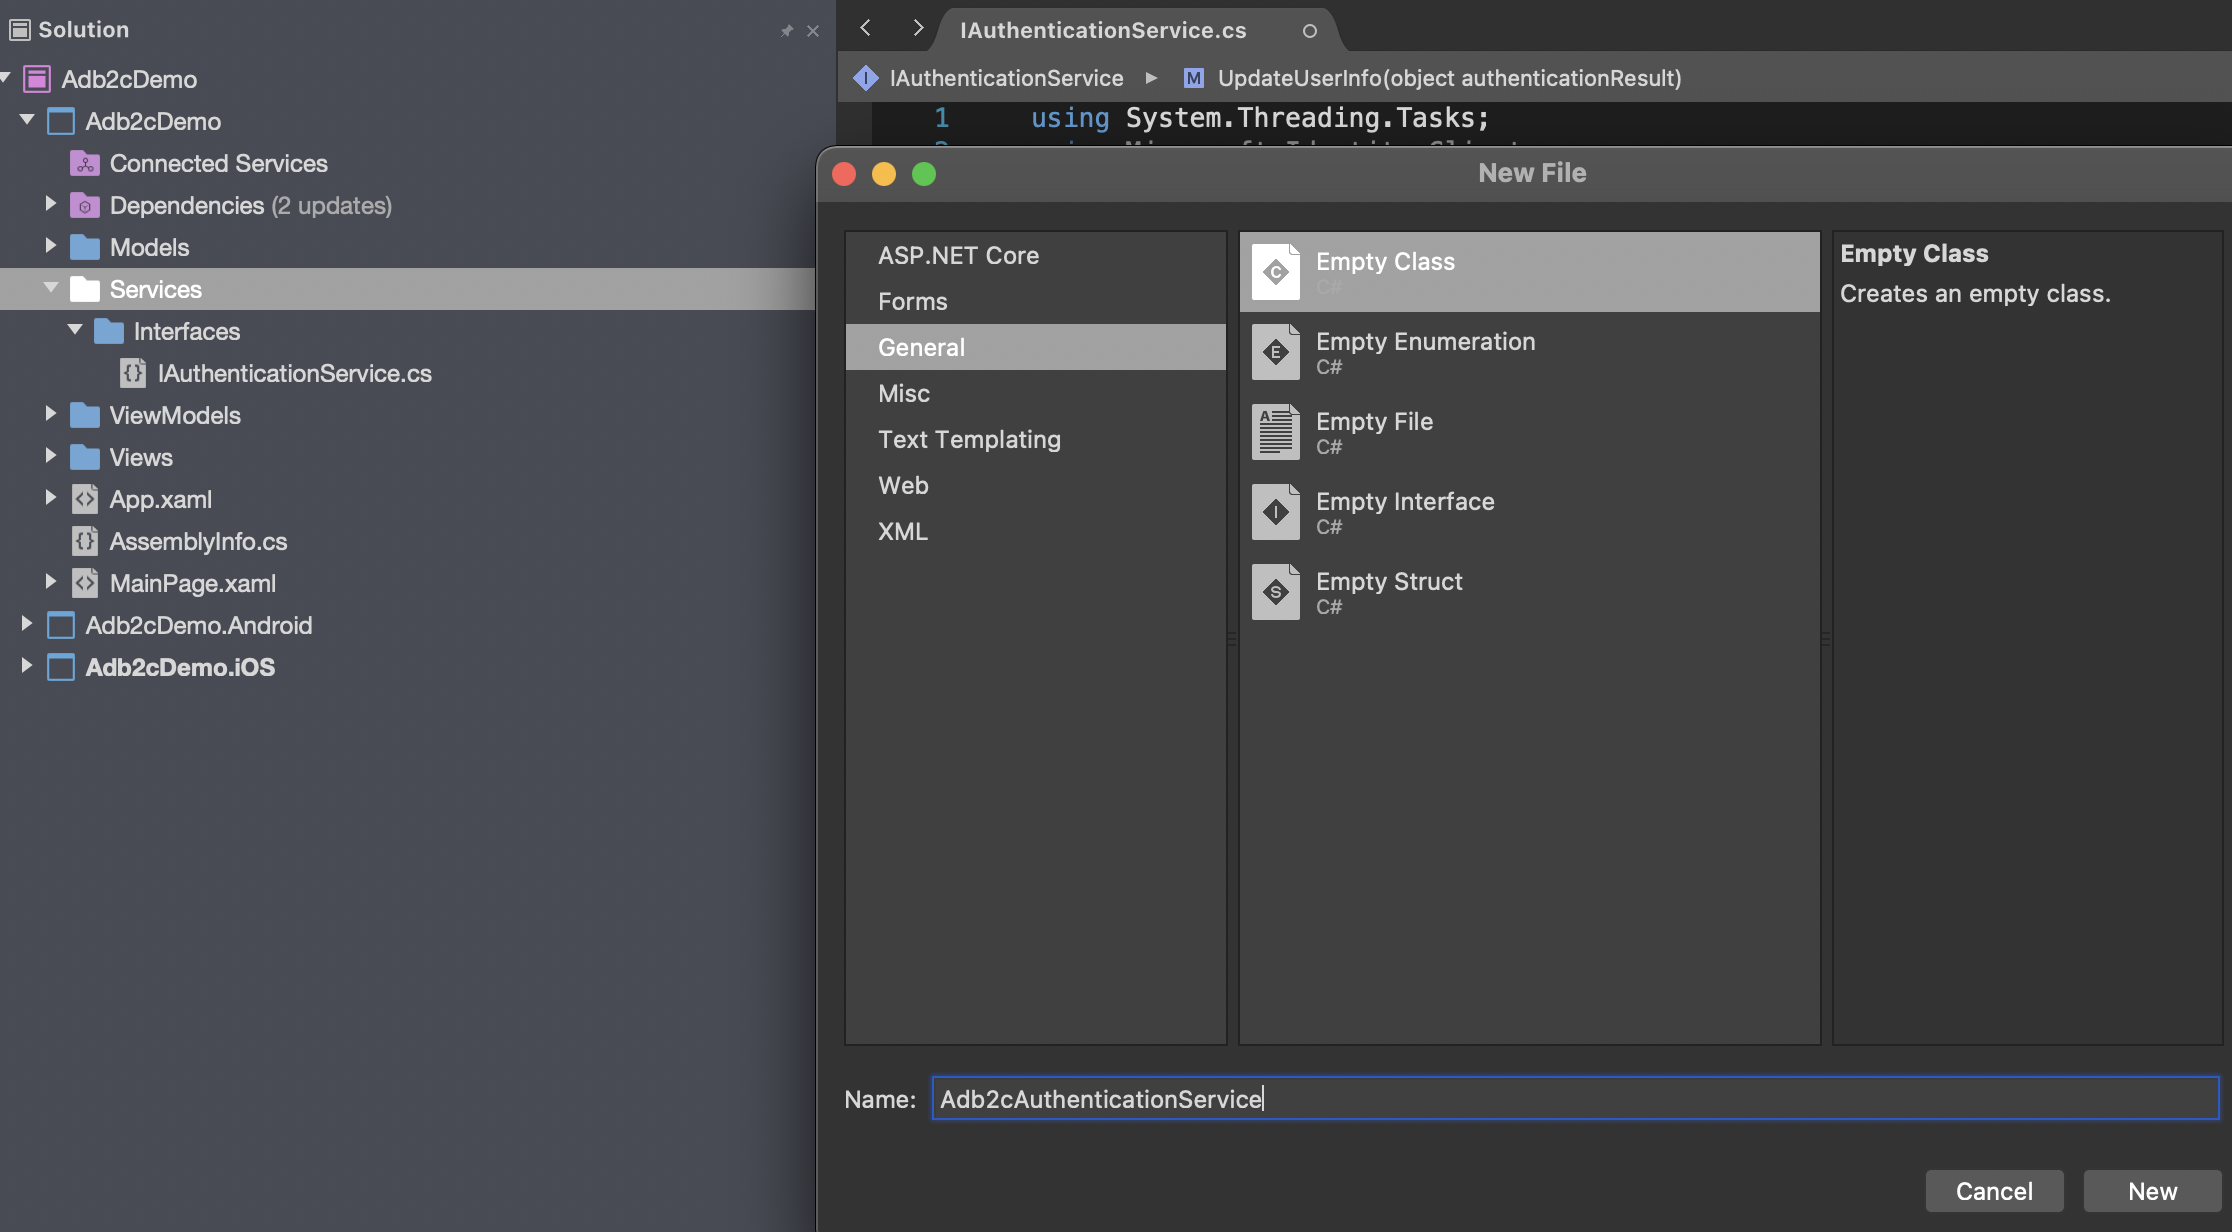
Ok - we're now ready to add the skeleton of the authentication service class. We'll begin by writing an interface which describes all the public members that we'll need. Create a Services folder, add a sub folder called Interfaces, and add a new interface in there called IAuthenticationService:
...and add this code into it:
public interface IAuthenticationService
{
    string ResetErrorCode { get; }
    Task<UserContext> SignInAsync();
    Task<UserContext> AcquireTokenSilent();
    Task<UserContext> ResetPasswordAsync();
    Task<UserContext> EditProfileAsync();
    Task<UserContext> SignInInteractively();
    Task<UserContext> SignOutAsync();
    UserContext UpdateUserInfo(object authenticationResult);
}
Note the parameter in UpdateUserInfo is an object. For our purposes in this example it will be an AuthenticationResult, but specifying that here would mean adding a dependency to Microsoft.Identity.Client into the interface.
Now it's time to implement that interface. Add a class into the Services folder called Adb2cAuthenticationService.
Now there's a fair bit to this service.
First, as we're not using an Mvvm framework we'll make use of the Xamarin.Forms DependencyService to manage instances of this service class. That requires the following decoration outside the namespace:
[assembly:Dependency(typeof(Adb2cAuthenticationService))]There's an error code that we'll make use of later, which we can define here:
public string ResetErrorCode => "AADB2C90118";Much of this code will make use of a PublicClientApplication object, which is part of the Microsoft.Identity.Client library. Before we use this, we need to declare it:
private IPublicClientApplication publicClientApplication;...and the instantiate it in the constructor of the service class, like this:
PublicClientApplicationBuilder builder =
    PublicClientApplicationBuilder
        .Create(applicationSettingsService.ADB2CClientId)
        .WithB2CAuthority(
            applicationSettingsService.ADB2CAuthoritySignUpSignIn)
        .WithIosKeychainSecurityGroup(
            applicationSettingsService.ADB2CiOSKeychainGroup)
        .WithRedirectUri(applicationSettingsService.ADB2CRedirectUri);
You can see we're using configuration values here for the client id, the sign up sign in policy id, the iOS keychain group and the redirect uri. Most of these will be taken from the AD B2C setup we completed in the first blog post of this series.
The remainder of the constructor is required to handle some Android jiggery-pokery. We need to get hold of the current activity so that the login popup can render itself. For this we'll make use of James Montemagno's CurrentActivity plugin, which we'll walk through in a moment. For now, add this code to the constructor of the service class:
// Android implementation is based on
// https://github.com/jamesmontemagno/CurrentActivityPlugin
IParentWindowLocatorService windowLocatorService =
    DependencyService.Get<IParentWindowLocatorService>();

if (windowLocatorService != null)
{
    builder = builder.WithParentActivityOrWindow(() =>
        windowLocatorService?.GetCurrentParentWindow());
}
...and then we need to actually build the public client application object:
publicClientApplication = builder.Build();You may come across code examples which use UIParent for this, often declared as a property of the App class, and populated by MainActivity immediately after the LoadApplication call. If you try to use that now you'll get error messages telling you that it's deprecated.
We're going to jump sideways for a moment now to set up those configuration values. The code is designed to allow us to implement these in a DevOps friendly json file (enabling us to use a single Build pipeline for the app and to replace these values in subsequent Release pipelines), but for now we'll just put them in as properties of a service class.
We'll modify this service class in a later post to make this all properly DevOps friendly.
First we'll need an interface - Services/Interfaces/IApplicationSettingsService.cs:
public interface IApplicationSettingsService
{
    string ApiBaseUrl { get; }

    string ADB2CTenantName { get; }
    string ADB2CHostName { get; }
    string ADB2CClientId { get; }
    string ADB2CPolicySignUpSignIn { get; }
    string ADB2CPolicyEditProfile { get; }
    string ADB2CPolicyResetPassword { get; }
    string ADB2CRedirectUri { get; }
    string[] ADB2CScopes { get; }
    string ADB2CAuthorityBase { get; }
    string ADB2CAuthoritySignUpSignIn { get; }
    string ADB2CAuthorityEditProfile { get; }
    string ADB2CAuthorityResetPassword { get; }
    string ADB2CiOSKeychainGroup { get; }
}
...and then we'll need its implementation - Services/ApplicationSettingsService.cs, which will contain the following:
    public string ApiBaseUrl => "ApiBaseUrl";

    public string ADB2CTenantName => "ADB2C.TenantName";
    public string ADB2CHostName => "ADB2C.HostName";
    public string ADB2CClientId => "ADB2C.ClientId";
    public string ADB2CPolicySignUpSignIn => "ADB2C.PolicySignUpSignIn";
    public string ADB2CPolicyEditProfile => "ADB2C.PolicyEditProfile";
    public string ADB2CPolicyResetPassword =>
        "ADB2C.PolicyResetPassword";
    public string ADB2CRedirectUri => "ADB2C.RedirectUri";
    public string[] ADB2CScopes =>
        new string[] { "openid", "offline_access", "ADB2C.Scope" };
    public string ADB2CAuthorityBase =>
        $"https://{ADB2CHostName}/tfp/{ADB2CTenantName}/";
    public string ADB2CAuthoritySignUpSignIn =>
        $"{ADB2CAuthorityBase}{ADB2CPolicySignUpSignIn}";
    public string ADB2CAuthorityEditProfile =>
        $"{ADB2CAuthorityBase}{ADB2CPolicyEditProfile}";
    public string ADB2CAuthorityResetPassword =>
        $"{ADB2CAuthorityBase}{ADB2CPolicyResetPassword}";
    public string ADB2CiOSKeychainGroup => "ADB2C.iOSKeychainGroup";
Obviously, these are all dummy values at this point. We'll come back to these shortly.
Lastly for now, we'll need to register this service class with the Xamarin.Forms DependencyService:
[assembly:Dependency(typeof(ApplicationSettingsService))]Writing this as a service class may seem like overkill to expose a bunch of constants, but the reasoning will become clear when we make this DevOps friendly in a later post.
Ok, now let's jump back to the authentication service class.
First, we want to give this access to our application settings service class, so add a declaration like this:
private readonly IApplicationSettingsService applicationSettingsService;...and then add this line to the constructor:
applicationSettingsService =
    DependencyService.Get<IApplicationSettingsService>();
Again, with a full Mvvm implementation we'd be using dependency injection here, making this more unit testable.
Now let's address those Android shenanigans that I mentioned earlier. This is basically to facilitate the display of the login screen correctly on Android. To do this we need to get hold of the current activity to give it to the public client application object. To get hold of this we'll need to jump out to some Android specific code, so add interface in the .Net Standard project - Services/Interfaces/IParentWindowLocatorService.cs:
namespace Adb2cDemo.Services.Interfaces
{
    public interface IParentWindowLocatorService
    {
        object GetCurrentParentWindow();
    }
}
...and an implementation of it in the Android project, in Services/ParentWindowLocatorService.cs:
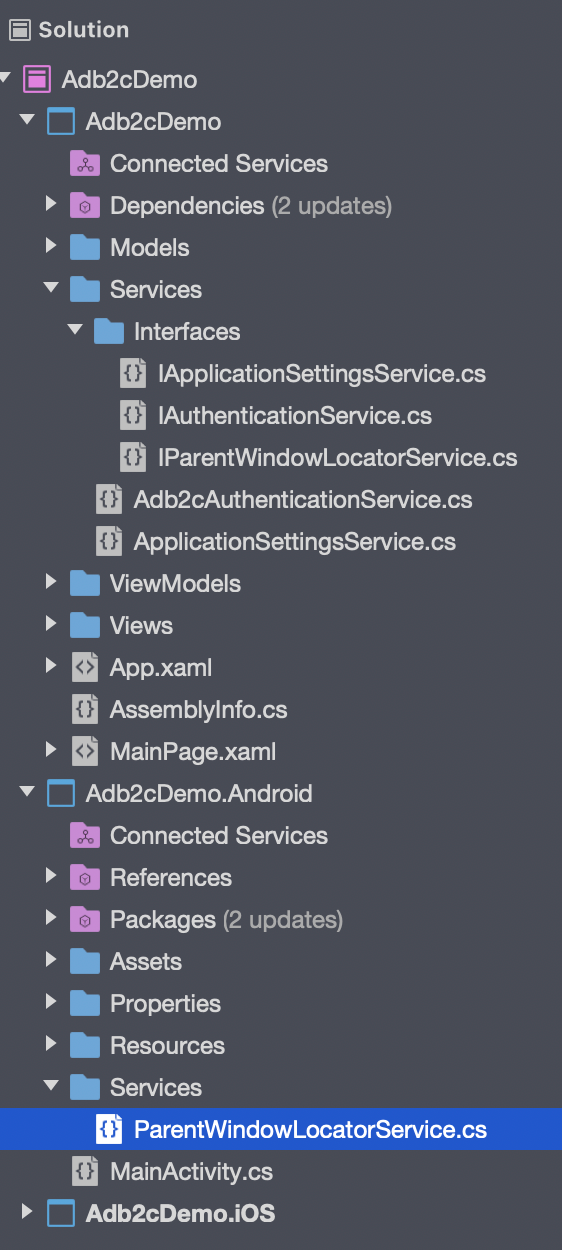
using Adb2cDemo.Droid.Services;
using Adb2cDemo.Services.Interfaces;
using Plugin.CurrentActivity;
using Xamarin.Forms;

[assembly:Dependency(typeof(ParentWindowLocatorService))]
namespace Adb2cDemo.Droid.Services
{
    public class ParentWindowLocatorService
        : IParentWindowLocatorService
    {
        public ParentWindowLocatorService()
        {
        }

        public object GetCurrentParentWindow()
        {
            return CrossCurrentActivity.Current.Activity;
        }
    }
}
Note again the line before the namespace to register this with the Xamarin.Forms DependencyService.
As I mentioned earlier, you'll need to bring the Plugin.CurrentActivity NuGet package into the Android project. Once that's done, add the following code to the OnCreate method in the main activity in the Android project:
CrossCurrentActivity.Current.Init(this, savedInstanceState);Ok - now we can once again get back to the authentication service class, Adb2cAuthenticationService.
The main driving method of this service is SignInAsync. This will be called from other parts of the app, and will return a UserContext object (which we defined earlier). The code in this method is quite simple:
public async Task<UserContext> SignInAsync()
{
    UserContext newContext;
    try
    {
        // acquire token silently
        newContext = await AcquireTokenSilent();
    }
    catch (MsalUiRequiredException)
    {
        // acquire token interactively
        newContext = await SignInInteractively();
    }
    return newContext;
}
If we can successfully acquire a token with no user interaction then we will, otherwise we'll need to involve the user.
AcquireTokenSilent looks like this:
public async Task<UserContext> AcquireTokenSilent()
{
    IEnumerable<IAccount> accounts =
        await publicClientApplication.GetAccountsAsync();

    AuthenticationResult authResult =
        await publicClientApplication
            .AcquireTokenSilent(
                applicationSettingsService.ADB2CScopes,
                GetAccountByPolicy(accounts,
                    applicationSettingsService.ADB2CPolicySignUpSignIn))
            .WithB2CAuthority(
                    applicationSettingsService
                        .ADB2CAuthoritySignUpSignIn)
           .ExecuteAsync();

    UserContext newContext = UpdateUserInfo(authResult);
    return newContext;
}
We're referencing the application settings service again here to get hold of some more, all important configuration values, defining the scope and the sign in sign up policy. We use these in conjunction with the previously constructed publicClientApplication object to interact with MSAL.
UpdateUserInfo will extract the claims from the authentication results and return a UserContext object containing them. In our example it looks like this:
public UserContext UpdateUserInfo(object authenticationResult)
{
    UserContext newContext = new UserContext();

    if (authenticationResult is AuthenticationResult ar)
    {
        newContext.IsLoggedOn = false;
        JObject user = ParseIdToken(ar.IdToken);

        newContext.AccessToken = ar.AccessToken;
        newContext.Name = user["name"]?.ToString();
        newContext.UserIdentifier = user["oid"]?.ToString();

        newContext.GivenName = user["given_name"]?.ToString();
        newContext.FamilyName = user["family_name"]?.ToString();

        newContext.StreetAddress = user["streetAddress"]?.ToString();
        newContext.City = user["city"]?.ToString();
        newContext.Province = user["state"]?.ToString();
        newContext.PostalCode = user["postalCode"]?.ToString();
        newContext.Country = user["country"]?.ToString();

        newContext.JobTitle = user["jobTitle"]?.ToString();

        JArray emails = user["emails"] as JArray;
        if (emails != null)
        {
            newContext.EmailAddress = emails[0].ToString();
        }
        newContext.IsLoggedOn = true;
    }

    return newContext;
}
This requires good old json.net and a couple of supporting methods, so add the NewtonSoft.json NuGet package, and then add the following two private methods:
private JObject ParseIdToken(string idToken)
{
    // Get the piece with actual user info
    idToken = idToken.Split('.')[1];
    idToken = Base64UrlDecode(idToken);
    return JObject.Parse(idToken);
}

private string Base64UrlDecode(string s)
{
    s = s.Replace('-', '+').Replace('_', '/');
    s = s.PadRight(s.Length + (4 - s.Length % 4) % 4, '=');
    byte[] byteArray = Convert.FromBase64String(s);
    string decoded =
        Encoding.UTF8.GetString(byteArray, 0, byteArray.Count());
    return decoded;
}
These methods, between them, will attempt to retrieve the access token from secure storage. If this fails, then an MsalUiRequiredException will be thrown, causing SignInAsync to call SignInInteractively, which looks like this:
public async Task<UserContext> SignInInteractively()
{
    AuthenticationResult authResult =
        await publicClientApplication.AcquireTokenInteractive(
            applicationSettingsService.ADB2CScopes)
        .ExecuteAsync();

    UserContext newContext = UpdateUserInfo(authResult);
    return newContext;
}
You'll see this pattern in the remaining methods as well - basically a call to a method provided by the publicClientApplication object, specifying the appropriate scope and any other required configuration details. The auth result is put through UpdateUserInfo to map it to a UserContext object, and returned.
So for EditProfileAsync:
public async Task<UserContext> EditProfileAsync()
{
    IEnumerable<IAccount> accounts =
        await publicClientApplication.GetAccountsAsync();

    AuthenticationResult authResult =
        await publicClientApplication.AcquireTokenInteractive(
            applicationSettingsService.ADB2CScopes)
            .WithAccount(
                GetAccountByPolicy(
                    accounts,
                    applicationSettingsService.ADB2CPolicyEditProfile))
            .WithPrompt(Prompt.NoPrompt)
            .WithAuthority(
                applicationSettingsService.ADB2CAuthorityEditProfile)
            .ExecuteAsync();

    UserContext userContext = UpdateUserInfo(authResult);

    return userContext;
}
This requires the GetAccountByPolicy method, which looks like this:
private IAccount GetAccountByPolicy(
    IEnumerable<IAccount> accounts, string policy)
{
    return accounts.FirstOrDefault(a =>
        a.HomeAccountId.ObjectId.Split('.')[0]
        .EndsWith(policy.ToLower()));
}
Likewise, ResetPasswordAsync looks like this:
public async Task<UserContext> ResetPasswordAsync()
{
    AuthenticationResult authResult =
        await publicClientApplication.AcquireTokenInteractive(
            applicationSettingsService.ADB2CScopes)
        .WithPrompt(Prompt.NoPrompt)
        .WithAuthority(
            applicationSettingsService.ADB2CAuthorityResetPassword)
        .ExecuteAsync();

        UserContext userContext = UpdateUserInfo(authResult);

        return userContext;
}
...and SignOutAsync like this:
public async Task<UserContext> SignOutAsync()
{
    IEnumerable<IAccount> accounts =
        await publicClientApplication.GetAccountsAsync();
    while (accounts.Any())
    {
        await publicClientApplication.RemoveAsync(
            accounts.FirstOrDefault());
        accounts = await publicClientApplication.GetAccountsAsync();
    }
    UserContext signedOutContext = new UserContext();
    signedOutContext.IsLoggedOn = false;
    return signedOutContext;
}
Ok, that's it for the authentication service class. Now we just need to add calls to it from the LoginViewModel. We'll grab an instance of the service class from the DependencyService.
Same caveat as earlier here - you'll likely be injecting the service class if you're using an Mvvm framework. This sample is intentionally kept simple.
In LoginViewModel, declare the service:
private readonly IAuthenticationService authenticationService;...and instantiate it in the constructor:
authenticationService = DependencyService.Get<IAuthenticationService>();Now we can add the code we need into the methods called by the two commands. For logging in, we want to attempt to call the login and then check for a specific failure reason. This is so that we can cater for the login failing when a password reset is required, and act accordingly. This makes use of the reset error code that we added as a property to the authentication service class earlier:
private async Task DoLoginCommand()
{
    try
    {
        UserContext userContext =
            await authenticationService.SignInAsync();
    }
    catch (Exception ex)
    {
        // Checking the exception message
        // Should ONLY be done for B2C reset and not any other error.
        if (ex.Message.Contains(authenticationService.ResetErrorCode))
        {
            OnPasswordReset();
        }
        // Alert if any exception excluding user
        // canceling sign-in dialog
        else if (((ex as MsalException)?.ErrorCode !=
            "authentication_canceled"))
        {
            await Application.Current.MainPage.DisplayAlert(
                $"Exception:", ex.ToString(), "Dismiss");
        }
    }
}
...and here's the OnPasswordReset method:
private async void OnPasswordReset()
{
    try
    {
        UserContext userContext =
            await authenticationService.ResetPasswordAsync();
    }
    catch (Exception ex)
    {
        // Alert if any exception excluding user
        // canceling sign-in dialog
        if (((ex as MsalException)?.ErrorCode
            != "authentication_canceled"))
        {
            // Handle the exception, for example:
            await Application.Current.MainPage.DisplayAlert(
                $"Exception:", ex.ToString(), "Dismiss");
        }
    }
}
...and finally the code to logout:
private async Task DoLogoutCommand()
{
    try
    {
        UserContext userContext =
            await authenticationService.SignOutAsync();
    }
    catch (Exception ex)
    {
        // Checking the exception message
        // should ONLY be done for B2C
        // reset and not any other error.
        if (ex.Message.Contains(authenticationService.ResetErrorCode))
        {
            OnPasswordReset();
        }
        // Alert if any exception excluding user
        // canceling sign-in dialog
        else if (((ex as MsalException)?.ErrorCode
            != "authentication_canceled"))
        {
            await Application.Current.MainPage.DisplayAlert(
                $"Exception:", ex.ToString(), "Dismiss");
        }
    }
}
The last thing we need to sort out is the list of configuration values:
ApiBaseUrl
We'll come on to this in a later post in this series.
TenantName
This is the name of your tenant in Azure and will be in the form of xxxxxxx.onmicrosoft.com. You can see it in the Azure portal here:
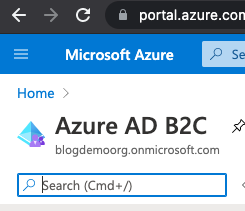
In my case this is blogdemoorg.onmicrosoft.com.
HostName
This will be the same as your tenant name, but with "b2clogin" instead of "onmicrosoft", so for me it's blogdemoorg.b2clogin.com. You can see this at the beginning of the auth endpoints in Azure if you go into the App Registration that we set up in the previous post in the series and select EndPoints:
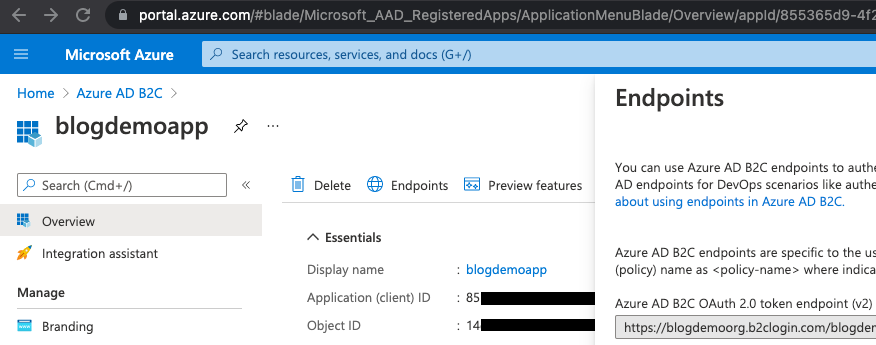
ClientId
This is the "Application (client) ID" value from the App Registration from the previous post in this series:
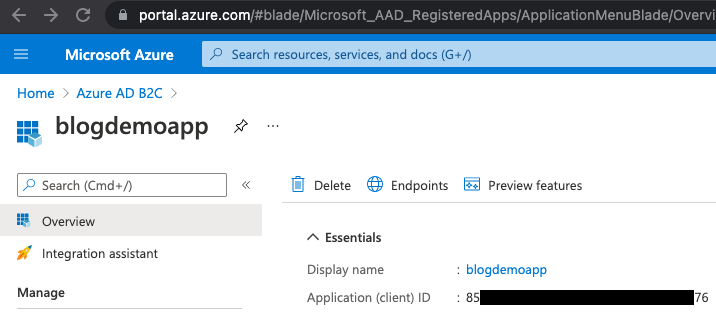
So for our example, this is 85xxxxxx-xxxx-xxxx-xxxx-xxxxxxxxxx76.
PolicySignUpSignIn
Again, we set this up in the previous post. In the Azure portal, select Azure AD B2C, and then choose the User flows blade to see the policies:
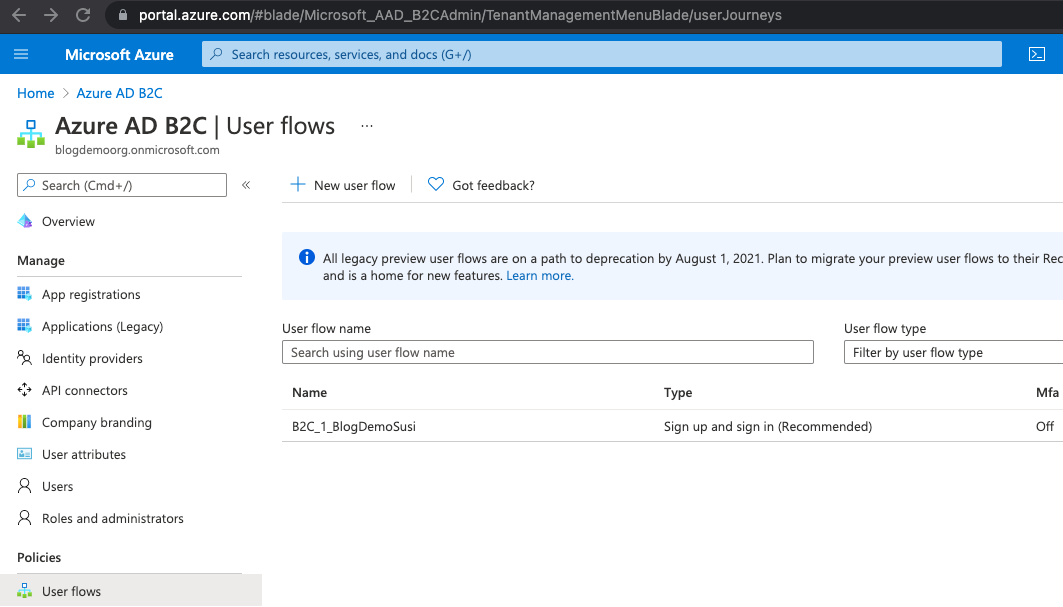
Ours is called "B2C_1_BlogDemoSusi".
PolicyEditProfile
We haven't set this up as yet, so we'll leave a dummy value in here. This can be set up in the same was as the sign up sign in policy and referenced here. The authentication service class is already set up to use this when necessary, if it's available.
PolicyResetProfile
Again, we haven't set this up, but doing so follows a similar pattern, and the authentication service class will use it if it's necessary and defined.
Redirect URI
You can find the value for this in the Authentication blade of the App Registration in Azure:
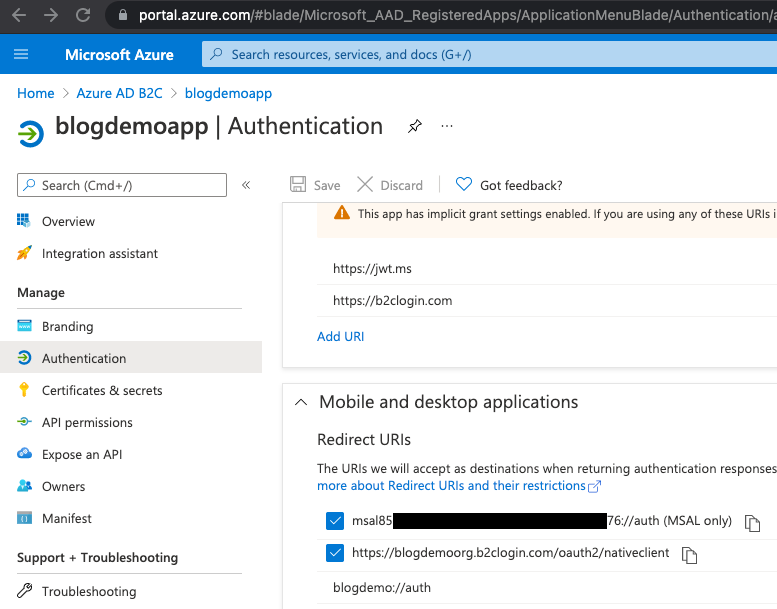
Scroll if necessary to see the Mobile and desktop applications section. Ours is blogdemo://auth.
Scopes
This is an array of strings containing "openid" and "offline_access". Later you can add in here any further scopes you might want to consider for your APIs.
iOSKeychainGroup
This should match your bundle id from your iOS project, so in our case it's com.obq.adb2cdemo.
The remaining properties are constructed for you from these values, so for our example, the ApplicationSettingsService contents look like this:
public string ApiBaseUrl => "ApiBaseUrl";
public string ADB2CTenantName => "blogdemoorg.onmicrosoft.com";
public string ADB2CHostName => "blogdemoorg.b2clogin.com";
public string ADB2CClientId => "85xxxxxx-xxxx-xxxx-xxxx-xxxxxxxxxx76";
public string ADB2CPolicySignUpSignIn => "B2C_1_BlogDemoSusi";
public string ADB2CPolicyEditProfile => "ADB2C.PolicyEditProfile";
public string ADB2CPolicyResetPassword => "ADB2C.PolicyResetPassword";
public string ADB2CRedirectUri => "blogdemo://auth";
public string[] ADB2CScopes =>
new string[] { "openid", "offline_access" };
public string ADB2CAuthorityBase =>
$"https://{ADB2CHostName}/tfp/{ADB2CTenantName}/";
public string ADB2CAuthoritySignUpSignIn =>
$"{ADB2CAuthorityBase}{ADB2CPolicySignUpSignIn}";
public string ADB2CAuthorityEditProfile =>
$"{ADB2CAuthorityBase}{ADB2CPolicyEditProfile}";
public string ADB2CAuthorityResetPassword =>
$"{ADB2CAuthorityBase}{ADB2CPolicyResetPassword}";
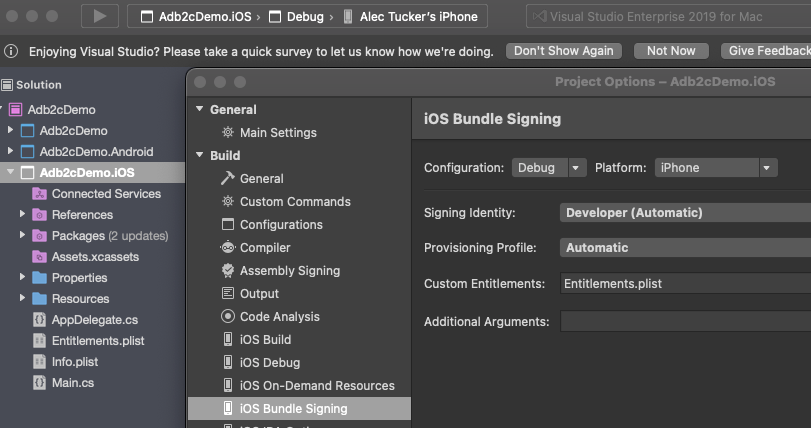
public string ADB2CiOSKeychainGroup => "com.obq.adb2cdemo";We're almost ready to run the app and try it out, but there's one last thing to check - if you're running on iOS we need to make sure you have access to the keychain groups. If you're running on a physical device then you'll need to go through the whole Apple setup (Application Id, signing certificate and publishing profile). Right click on your iOS project and select Options:
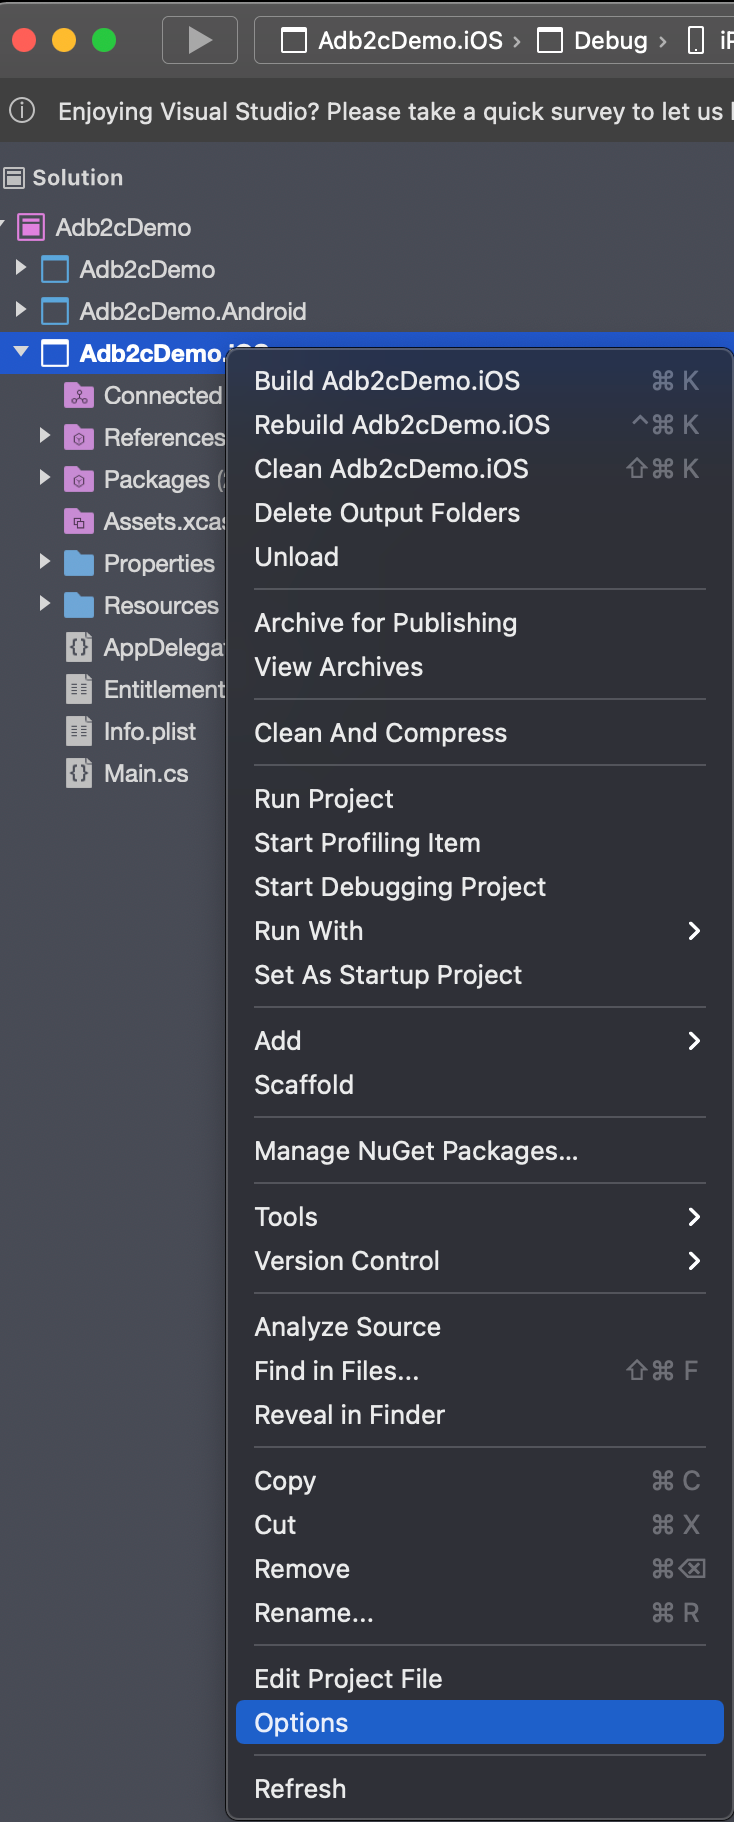
You'll likely see this:
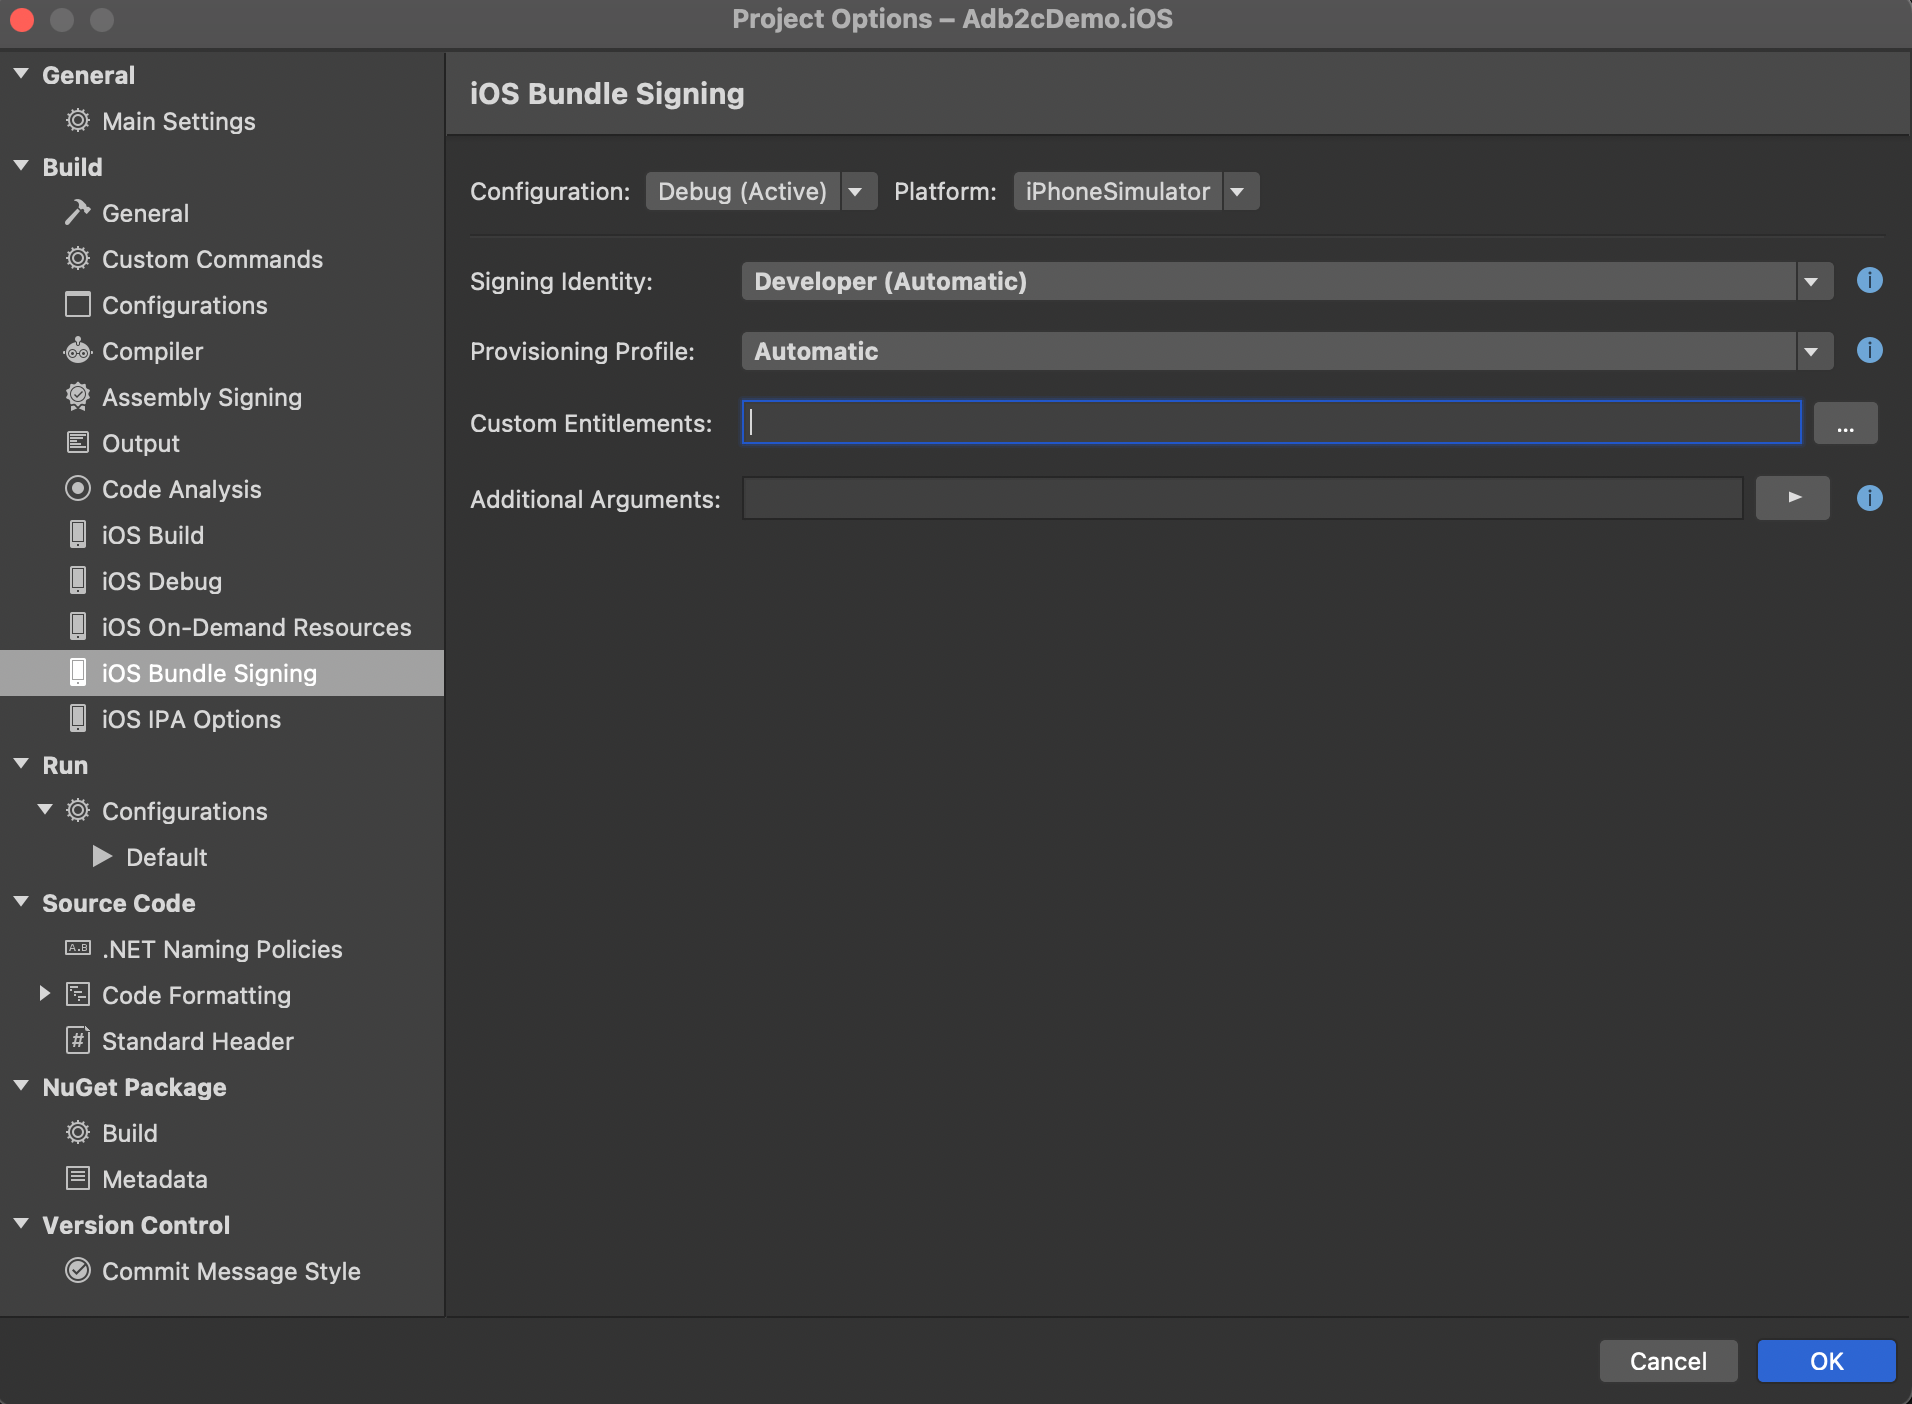
Note that the Custom Entitlements field is empty by default when you have 'Debug' and 'iPhone Simulator' selected. Make sure you've got these selected, and then just enter "Entitlements.plist" into this field and click OK.
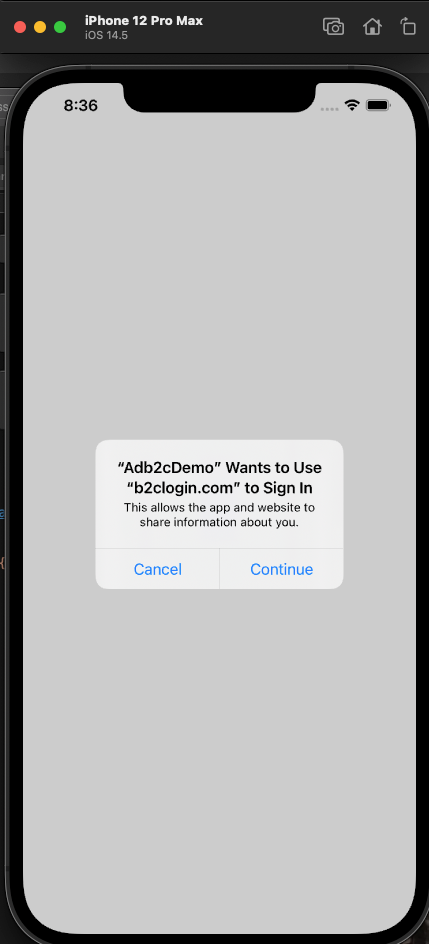
You're now ready to test. Our inspired UI design looks like this:

Click Login:
Select 'Continue'. If you get any errors at this stage then check that all of your configuration values in the ApplicationSettingsService class match the above code EXACTLY. It's very easy to get something wrong here, and difficult and time consuming to track it down if you do. If you're still having difficulties then also check the iOS and Android specific sections above.
If you've got all that right then you should see this:
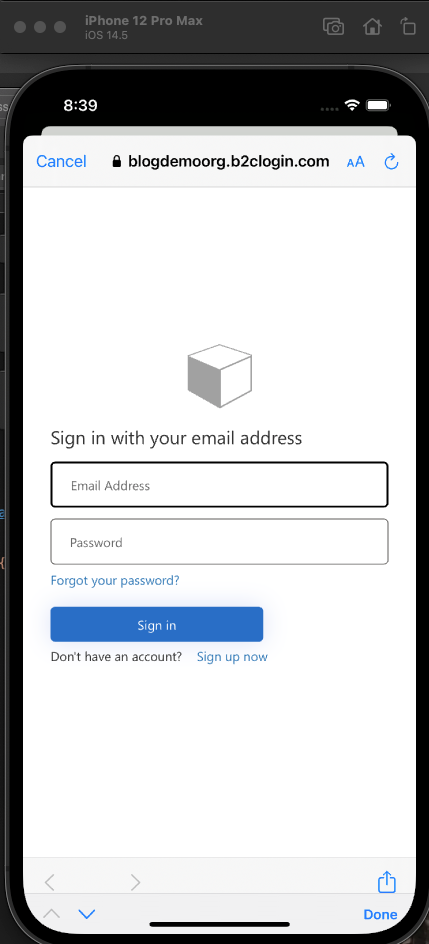
Sign in using the account that you registered from the previous post, where we covered all of the AD B2C setup and click Sign in. You should now be able to follow this through debugging and confirm that you're getting a UserContext object back.
In the next post we'll create and deploy an API, ready to be secured using AD B2C.
Happy coding.